I published this tweet a few days ago on using my Claude Code image generator plugin with the new Claude Code Playground plugin to improve image generations. The tweet blew up and there was a lot of interest in the process, so I am sharing a bit on how I achieved it.
Claude Code can generate and edit images directly from your terminal using the image generator plugin. It can do this in an agentic loop so it can self-improve images given a criteria or set of instructions.
I refer to this process as Agentic Image Generation. In this tutorial, we'll walk through a simple example of what you can do with it - from simple text-to-image generation to editing existing photos and creating professional assets for your projects.
Another powerful plugin you can combine in with is the new Claude Code Playground plugin which takes image generation to another level.
Installing the Plugin
The image generator plugin is part of the DAIR.AI Academy Plugins marketplace.
Step 1: Add the marketplace to Claude Code:
/plugin marketplace add dair-ai/dair-academy-plugins
Step 2: Install the image generator plugin:
/plugin install image-generator@dair-academy-plugins
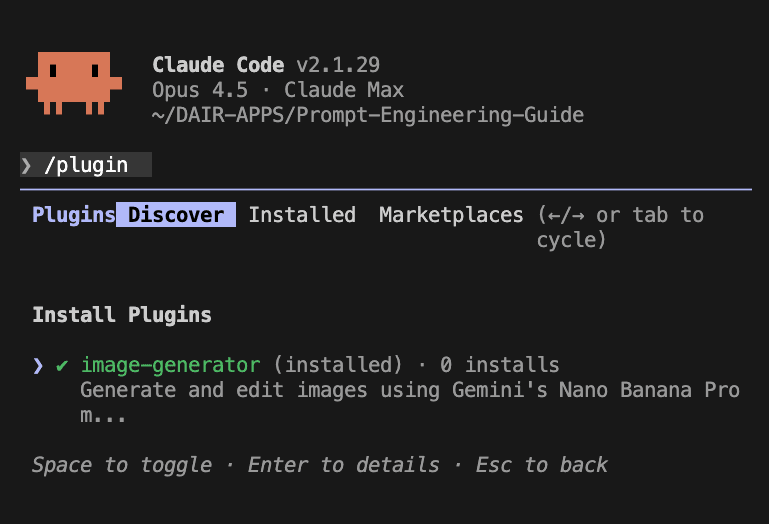
You can also install it from the Marketplace in Claude Code by typing in /plugin and then adding dair-ai/dair-academy-plugins as a marketplace and then installing the image-generator plugin from the set of plugins.

Step 3: Get a free Gemini API key from Google AI Studio and add it to your shell profile (~/.zshrc or ~/.bashrc):
export GEMINI_API_KEY="your_api_key_here"
Then restart your terminal or run source ~/.zshrc.
That's it! The plugin is ready to use.
Under the hood, the plugin uses Google's Nano Banana Pro model (gemini-3-pro-image-preview) for image generation. It supports text-to-image, image editing, multi-image composition, and outputs up to 4K resolution.
Note that this is a first version of this plugin and there is more improvements to come. But it should simplify the process of generating images in Claude Code.
New to Claude Code? Our course covers everything from setup to building full AI-powered apps — including how to use plugins like this one.
Generating an Infographic from a Blog Post
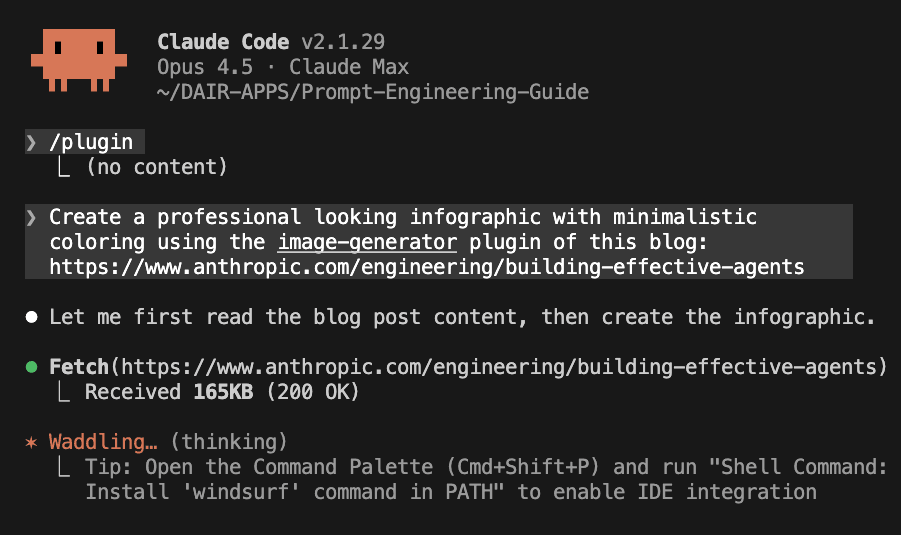
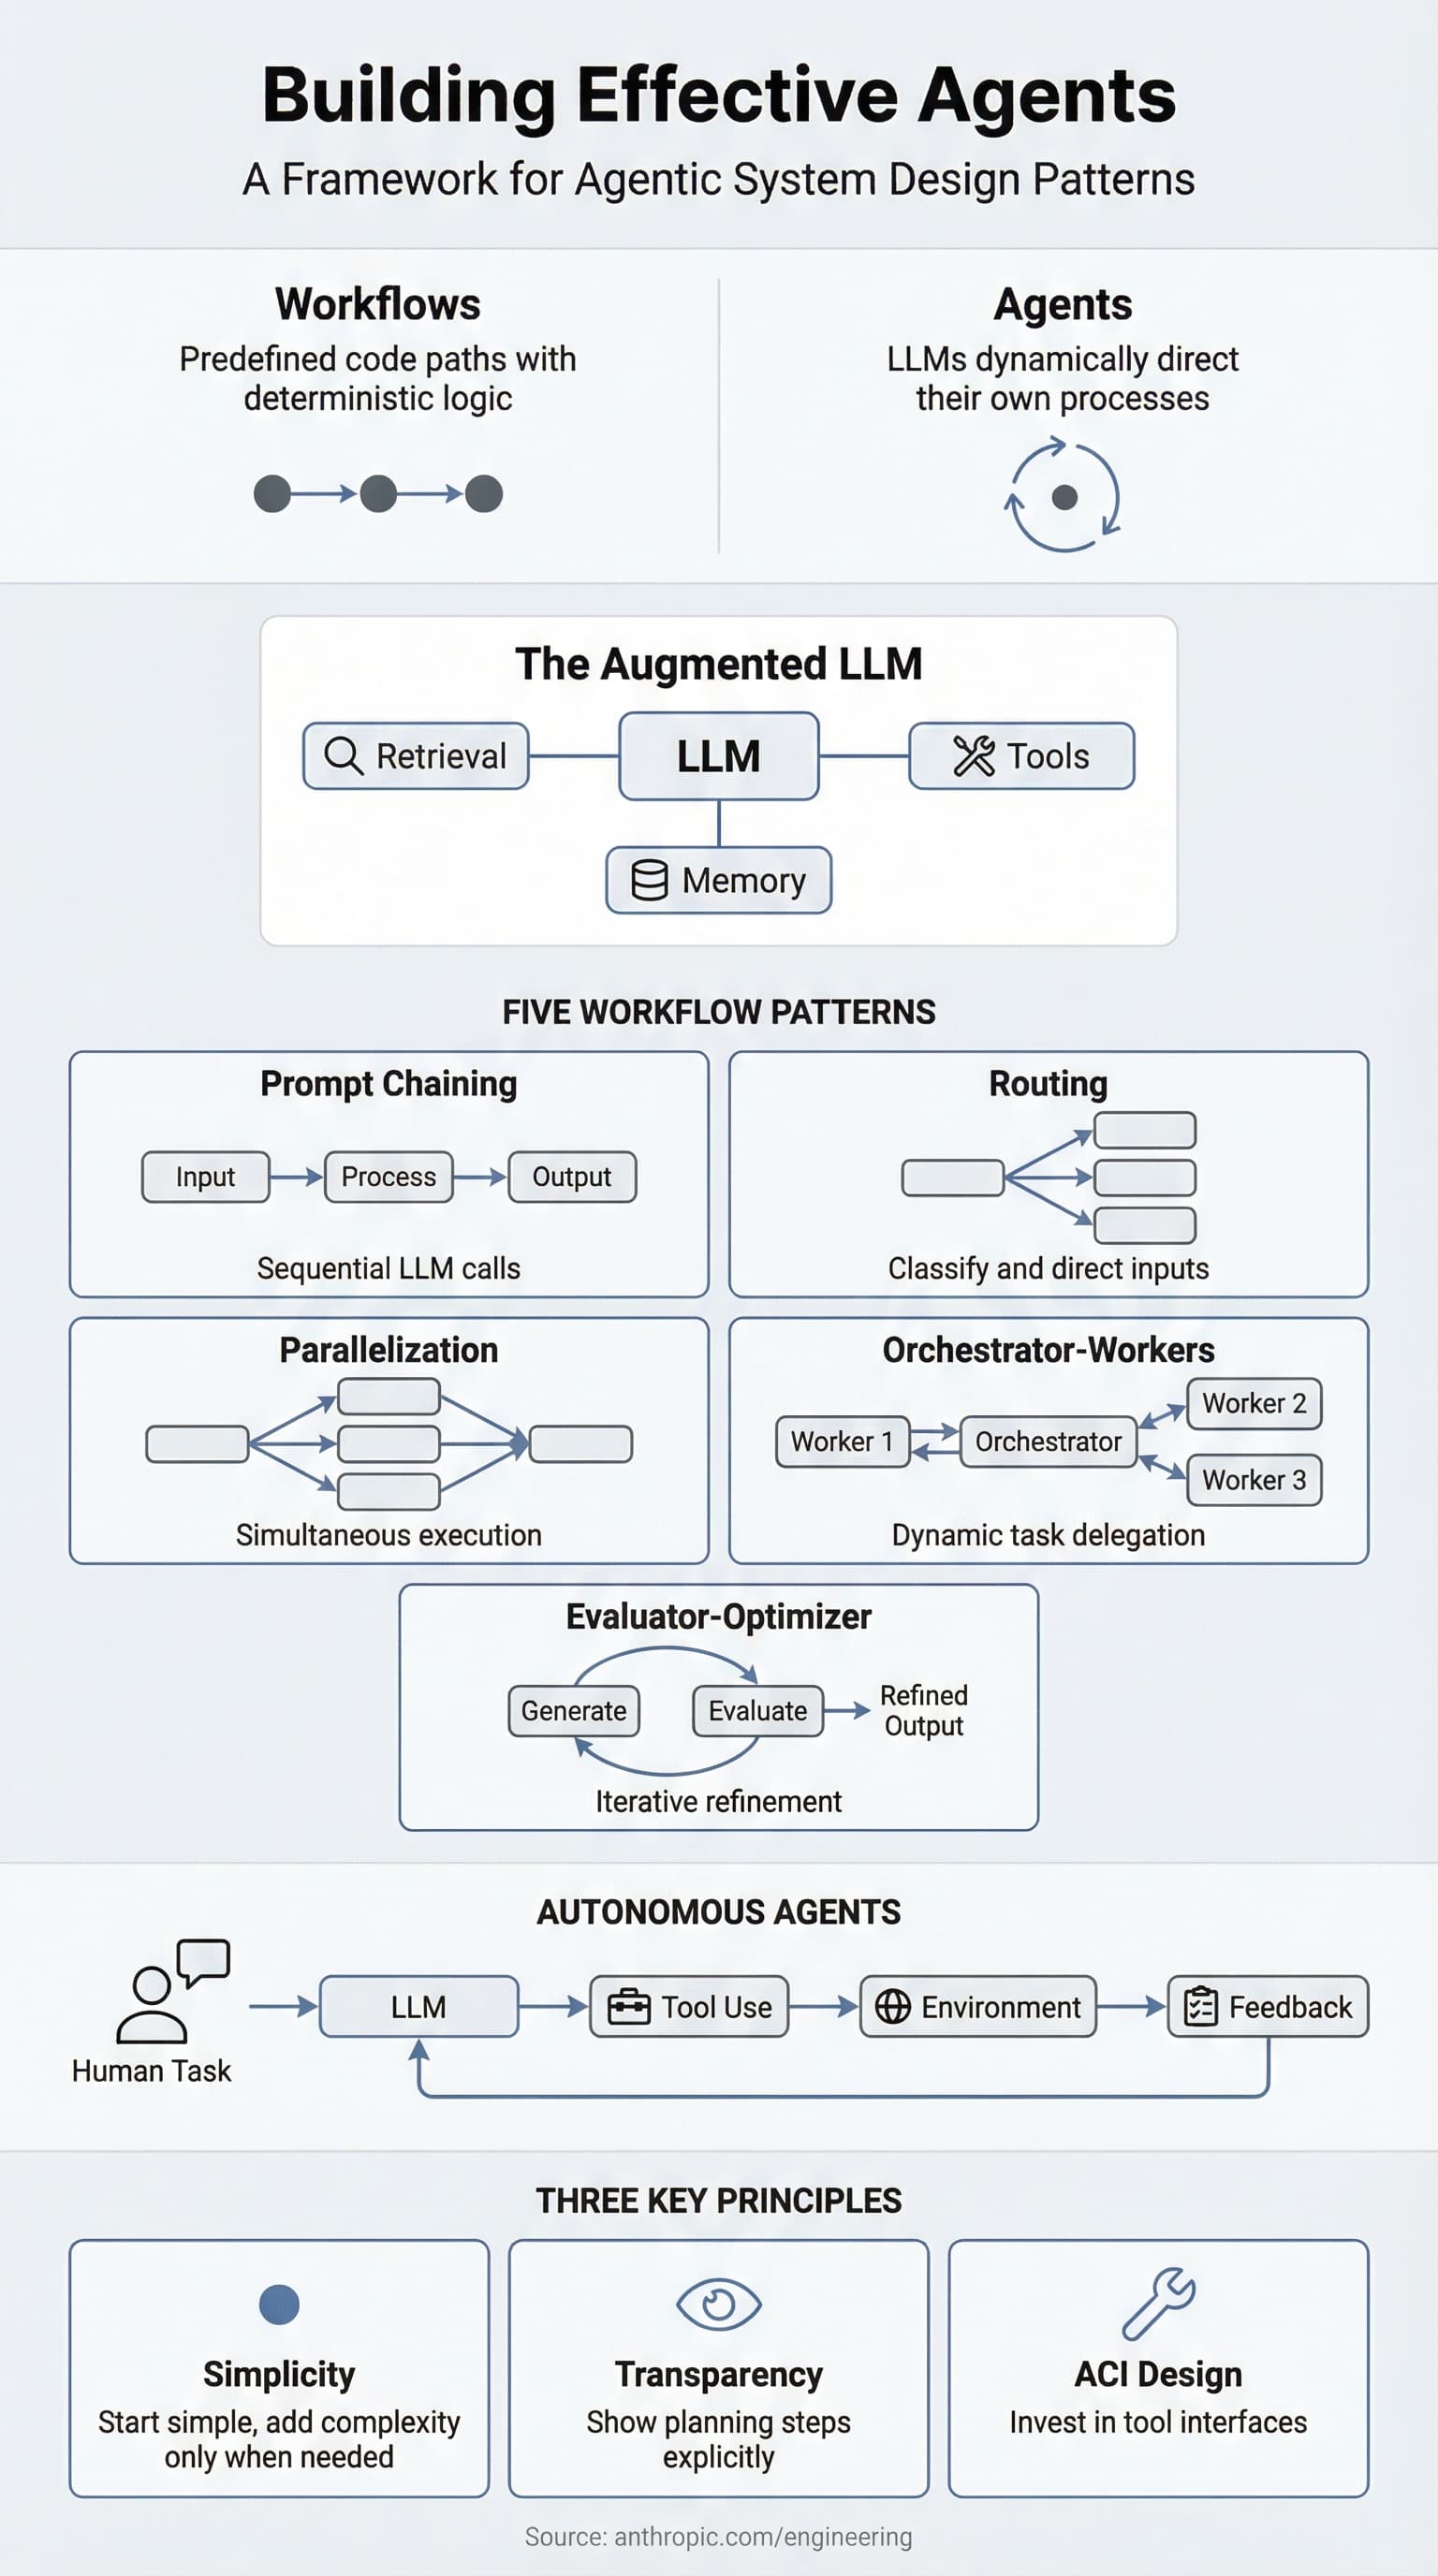
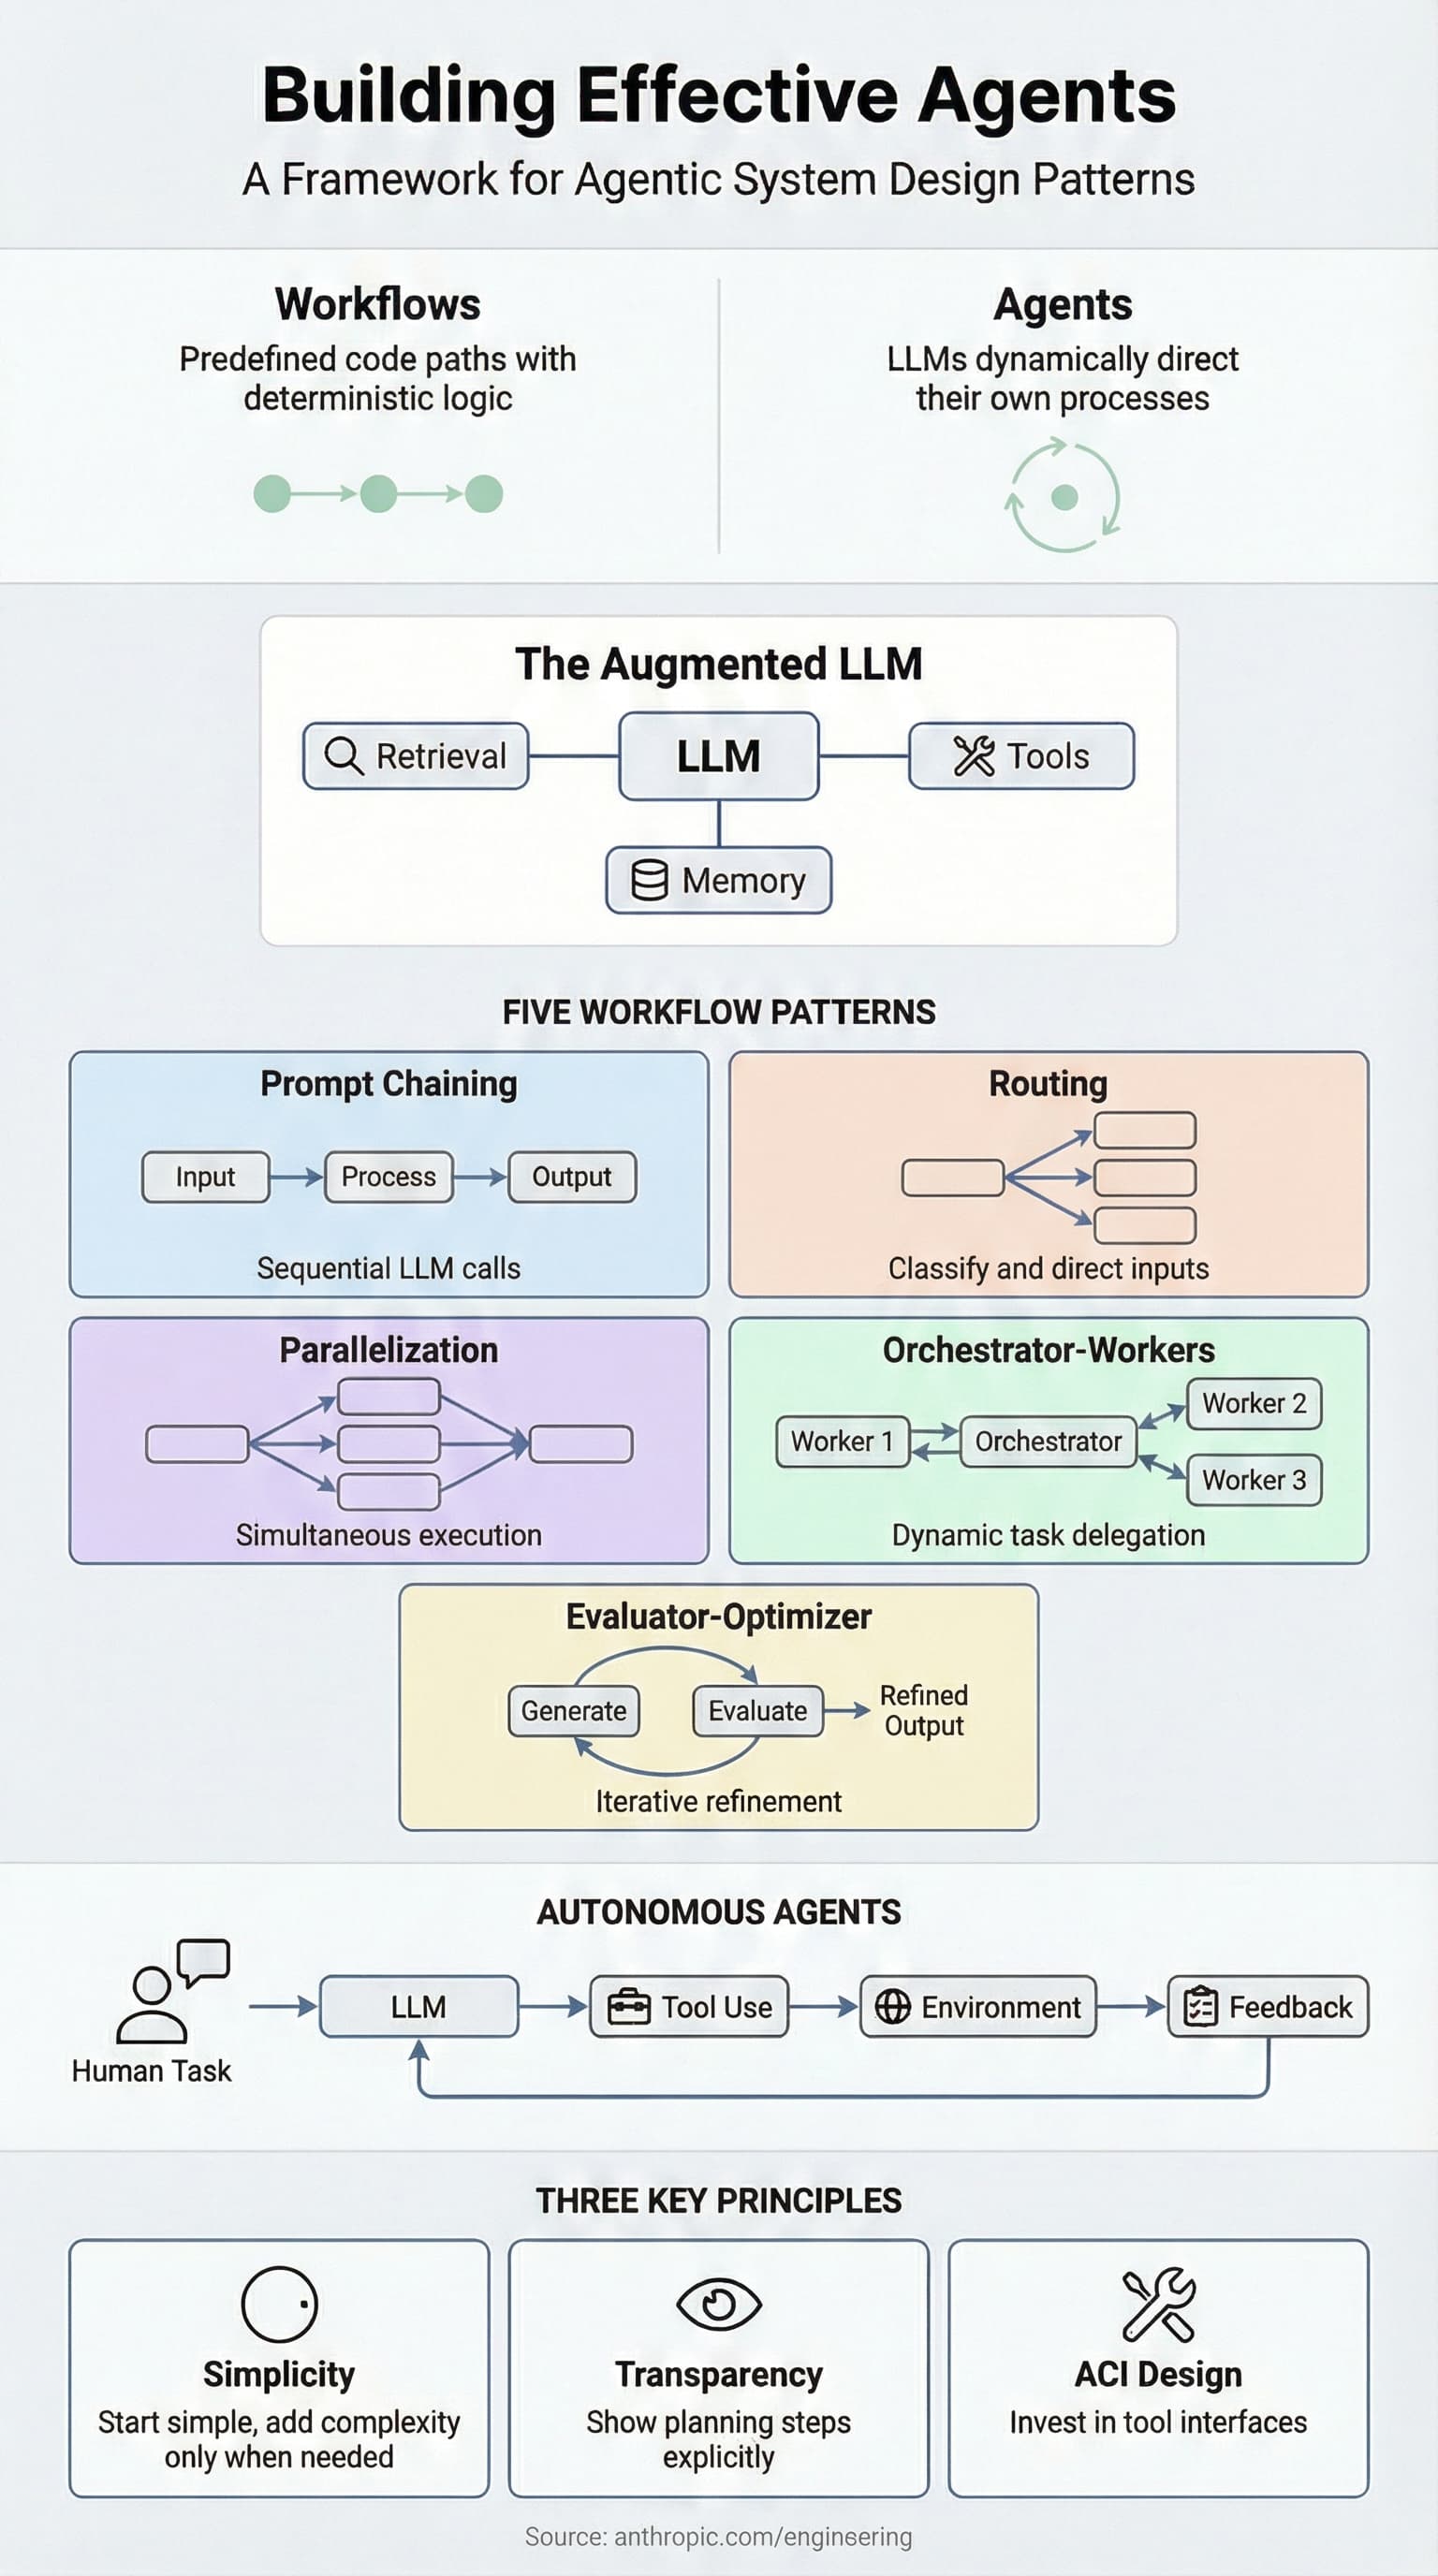
Let's walk through a real example. Say you want to create a professional infographic summarizing Anthropic's Building Effective Agents blog post. Here's what you type into Claude Code:
> Create a professional looking infographic with minimalistic coloring using the image-generator plugin of this blog: https://www.anthropic.com/engineering/building-effective-agents
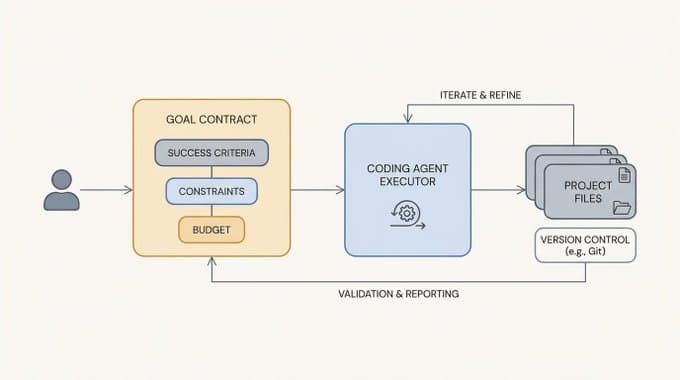
Claude Code reads the blog post, extracts the key concepts, and generates a clean infographic, all in one step.
Here's the infographic it generated:
That's it. One prompt. Claude Code fetches the article, understands the content, crafts a detailed image generation prompt, calls the Gemini API, and saves the result. No manual steps, no copying text, no switching between tools. And you can ask Claude Code to access each generated image, and improve on each iteration in a self-improving loop. You can easily achieve this by providing adequate instructions to Claude Code. I will be writing a separate blog post on that soon.
Keep in mind that I didn't try hard to get a phenomenal image or anything like that. You could do that easily by investing more time in the initial prompt. I just wanted to keep it simple to focus the tutorial on the overall process of agentic image generation, which can be applied and leveraged in really interesting ways.
But if you are a beginner, you describe what you want at a high level and the agent handles the entire workflow: reading sources, deciding on layout, choosing colors, and producing the final image.
Building an Image Annotation Tool with Playground
Plugins become even more powerful when you combine them. Say you've generated an infographic and now want to annotate it (highlight sections, add labels, or mark areas for revision). Instead of opening a separate tool, you can use the Playground plugin to build an interactive annotation interface right from Claude Code.
The Playground plugin creates self-contained HTML tools with interactive controls and live previews. You can ask Claude Code to generate an image annotation playground that lets you visually mark up any image:
> now using the playground plugin build me an interface so I can see the image and allow me to label parts specifically that need improvement.
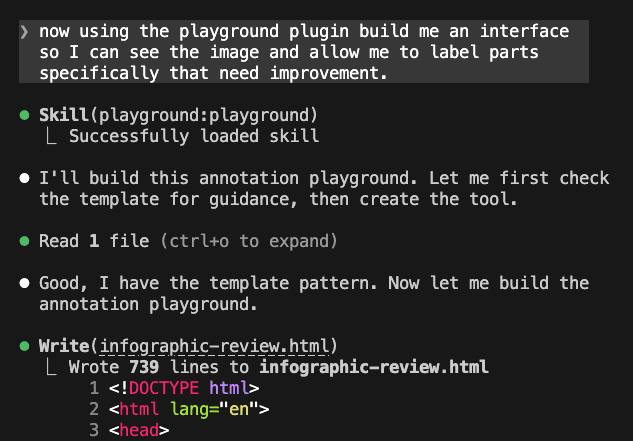
The result is a single HTML file you can open in your browser. Here's what the annotation tool looks like in action. We're using it to review and improve the infographic we just generated:
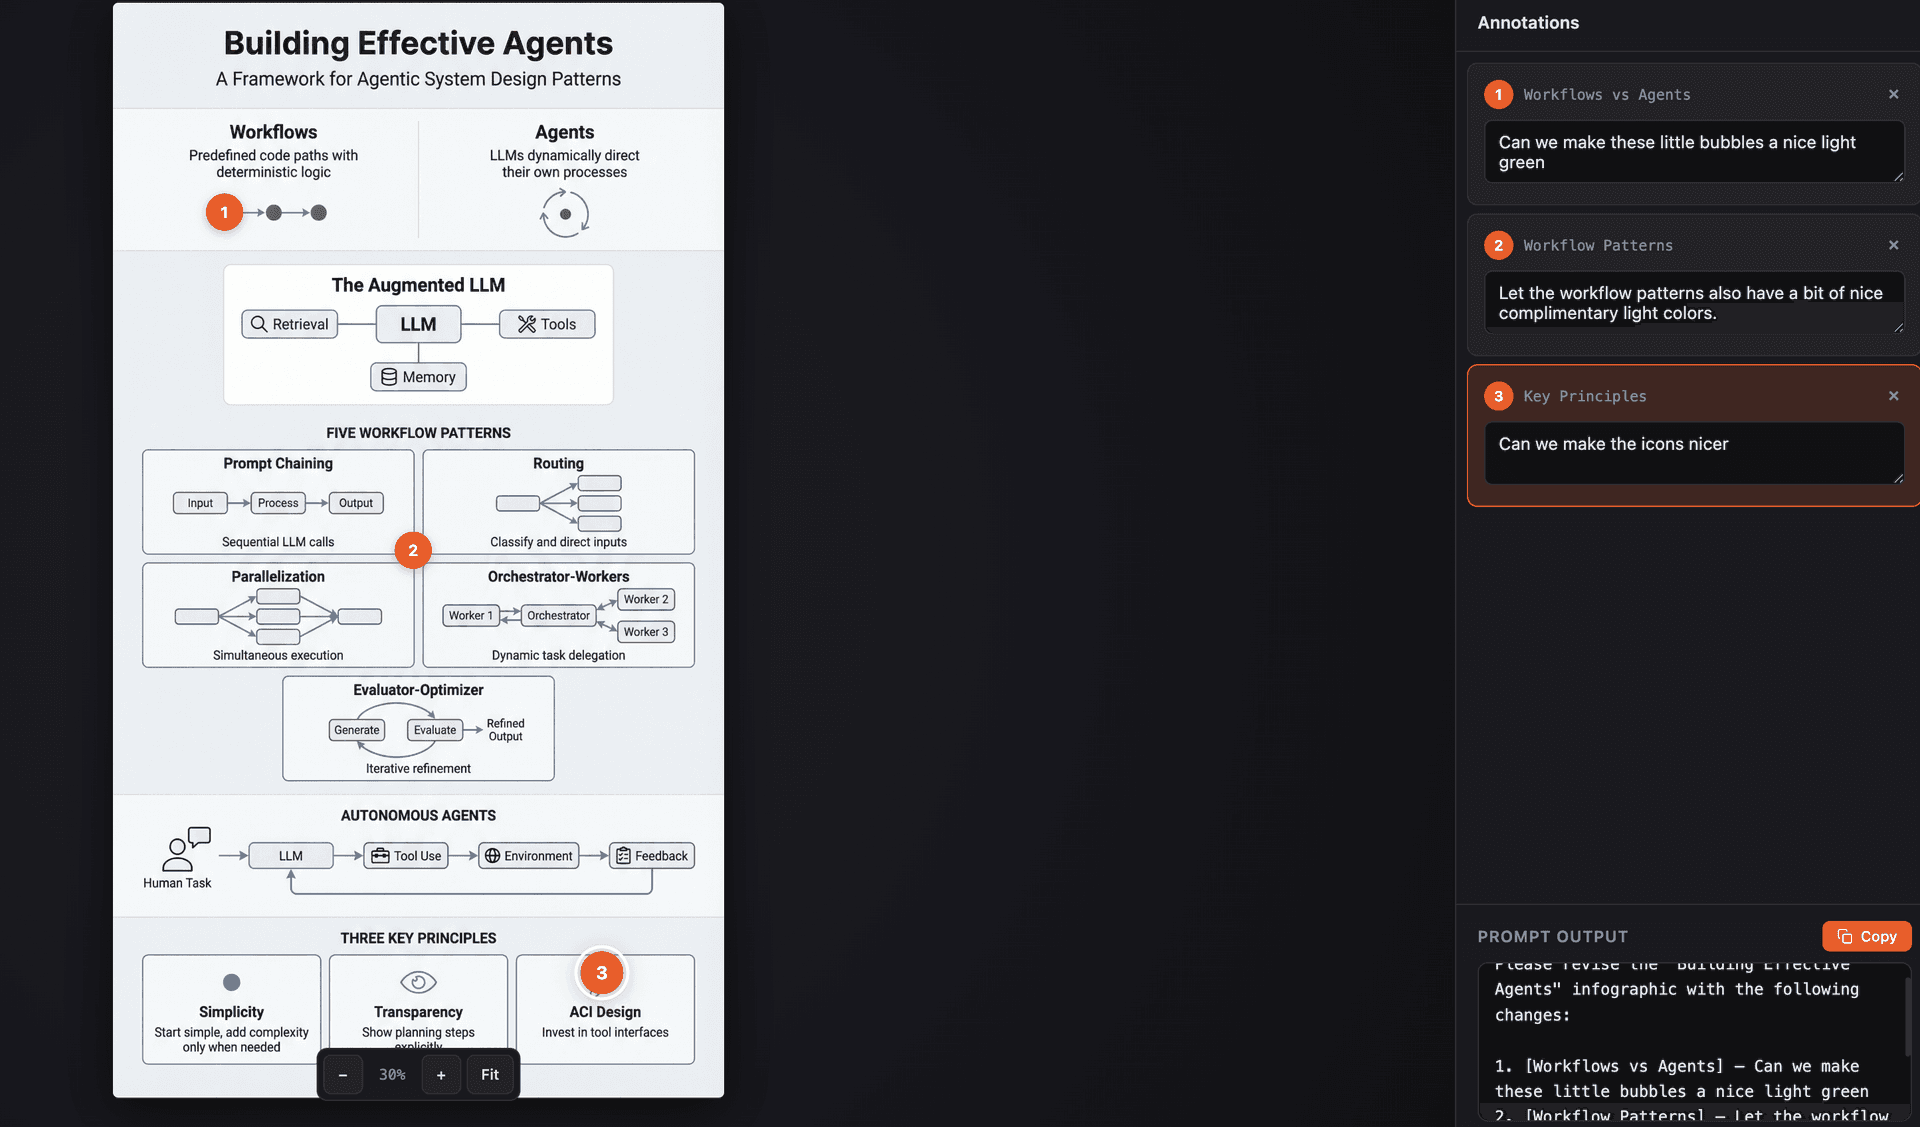
On the left you have the infographic with numbered annotation markers. On the right, an annotations panel where you can add feedback for each section. Note the annotated improvements like "make these bubbles a nice light green" or "can we make the icons nicer". At the bottom, there's a prompt output that compiles all your annotations into a single ready-to-use prompt.
Once you're done annotating, hit copy on the generated prompt and paste it straight back into Claude Code:
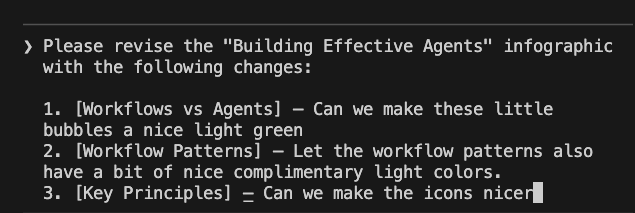
The playground compiled our three annotations into a structured revision prompt:
> Please revise the "Building Effective Agents" infographic
  with the following changes:

  1. [Workflows vs Agents] -Can we make these little
  bubbles a nice light green
  2. [Workflow Patterns] -Let the workflow patterns also
  have a bit of nice complementary light colors.
  3. [Key Principles] -Can we make the icons nicer
No manual prompt writing needed. Claude takes the feedback, calls the image generator again, and produces an improved version of the infographic:
The light green bubbles, colorful workflow pattern sections, and cleaner icons - all applied from the annotations we made in the playground.
This is the full agentic loop: generate → annotate → refine. The image generator creates the visual, the playground plugin builds the review tool, you add your feedback visually, and then feed that back to the agent for the next iteration. The entire cycle happens without leaving your terminal and browser.
What Else Can You Generate?
The same pattern works for any kind of visual. Here are a few ideas:
- Blog cover images -"Generate a 16:9 cover for my post about RAG pipelines, save it to public/blog/rag-cover.png"
- Product mockups -"Create a MacBook mockup showing our dashboard UI with studio lighting"
- Logos and brand assets -"Design a minimalist logo for a project called Nexus AI in blue and white"
- Social media graphics -"Generate a 9:16 image of a developer workspace for my Instagram story"
- Diagrams and visuals -"Create a clean architecture diagram showing the data flow in our system"
- Image editing -"Take ./assets/photo.png and remove the background, replace with white"
You can also combine multiple images, specify aspect ratios (1:1, 16:9, 9:16, 3:2), choose resolutions (1K, 2K, 4K), and iterate on results by asking Claude to adjust colors, composition, or style.
Tips for Better Results
- Be descriptive - "A snow-capped mountain at sunrise with golden light" beats "mountain"
- Mention the use case - Tell Claude Code where the image will be used so it picks the right style and dimensions
- Specify style - Photography terms ("85mm lens, bokeh"), art styles ("flat vector, pastel"), or references all help
- Iterate - If the first result isn't right, just describe what to change: "make it warmer" or "less busy"
Try it out. Start with an infographic or a blog cover and experiment from there.
Go Deeper With A Workshop
If you are interested, we will be doing a live walkthough of this process for our Pro subscribers this Friday.

Want to learn more about building with AI? Check out our courses or join the community to ask follow up questions about this post or discuss with other builders.