Google just released Nano Banana 2, their latest image generation model. The Nano Banana 2 model (API model ID: gemini-3.1-flash-image-preview) follows Nano Banana Pro (gemini-3-pro-image-preview) that we used in our Agentic Image Generation tutorial.
Google highlighted several key improvements: subject consistency for up to 5 characters and 14 objects, improved text rendering, world knowledge grounding, and better visual quality with richer textures and lighting.
We wanted to know: do these claims hold up in practice? We ran the same experiments from our previous post with both models side by side, and then added three new tests targeting the specific features Google highlighted.
Nano Banana 2 Setup
If you already have the image-generator plugin installed from our previous tutorial, you just need to update the model. The new model ID is:
gemini-3.1-flash-image-preview
It works with the same Gemini API key you already have. No other changes needed.
The pricing is also worth noting: Nano Banana 2 costs roughly $0.067/image, which is about 50% cheaper than Nano Banana Pro. Text tokens are 75% cheaper too.
Experiment 1: Infographic Generation
We used the same prompt from our original tutorial: creating a professional infographic summarizing Anthropic's Building Effective Agents guide.
Prompt:
Create a professional infographic with minimalistic coloring summarizing
the key concepts from Anthropic's Building Effective Agents guide.
Include sections on: Augmented LLMs, Workflow Patterns (Prompt Chaining,
Routing, Parallelization, Orchestrator-Workers, Evaluator-Optimizer),
and Autonomous Agents. Use a clean vertical layout with icons, minimal
color palette of blues and grays, and clear hierarchy.
Nano Banana Pro (Previous Model)
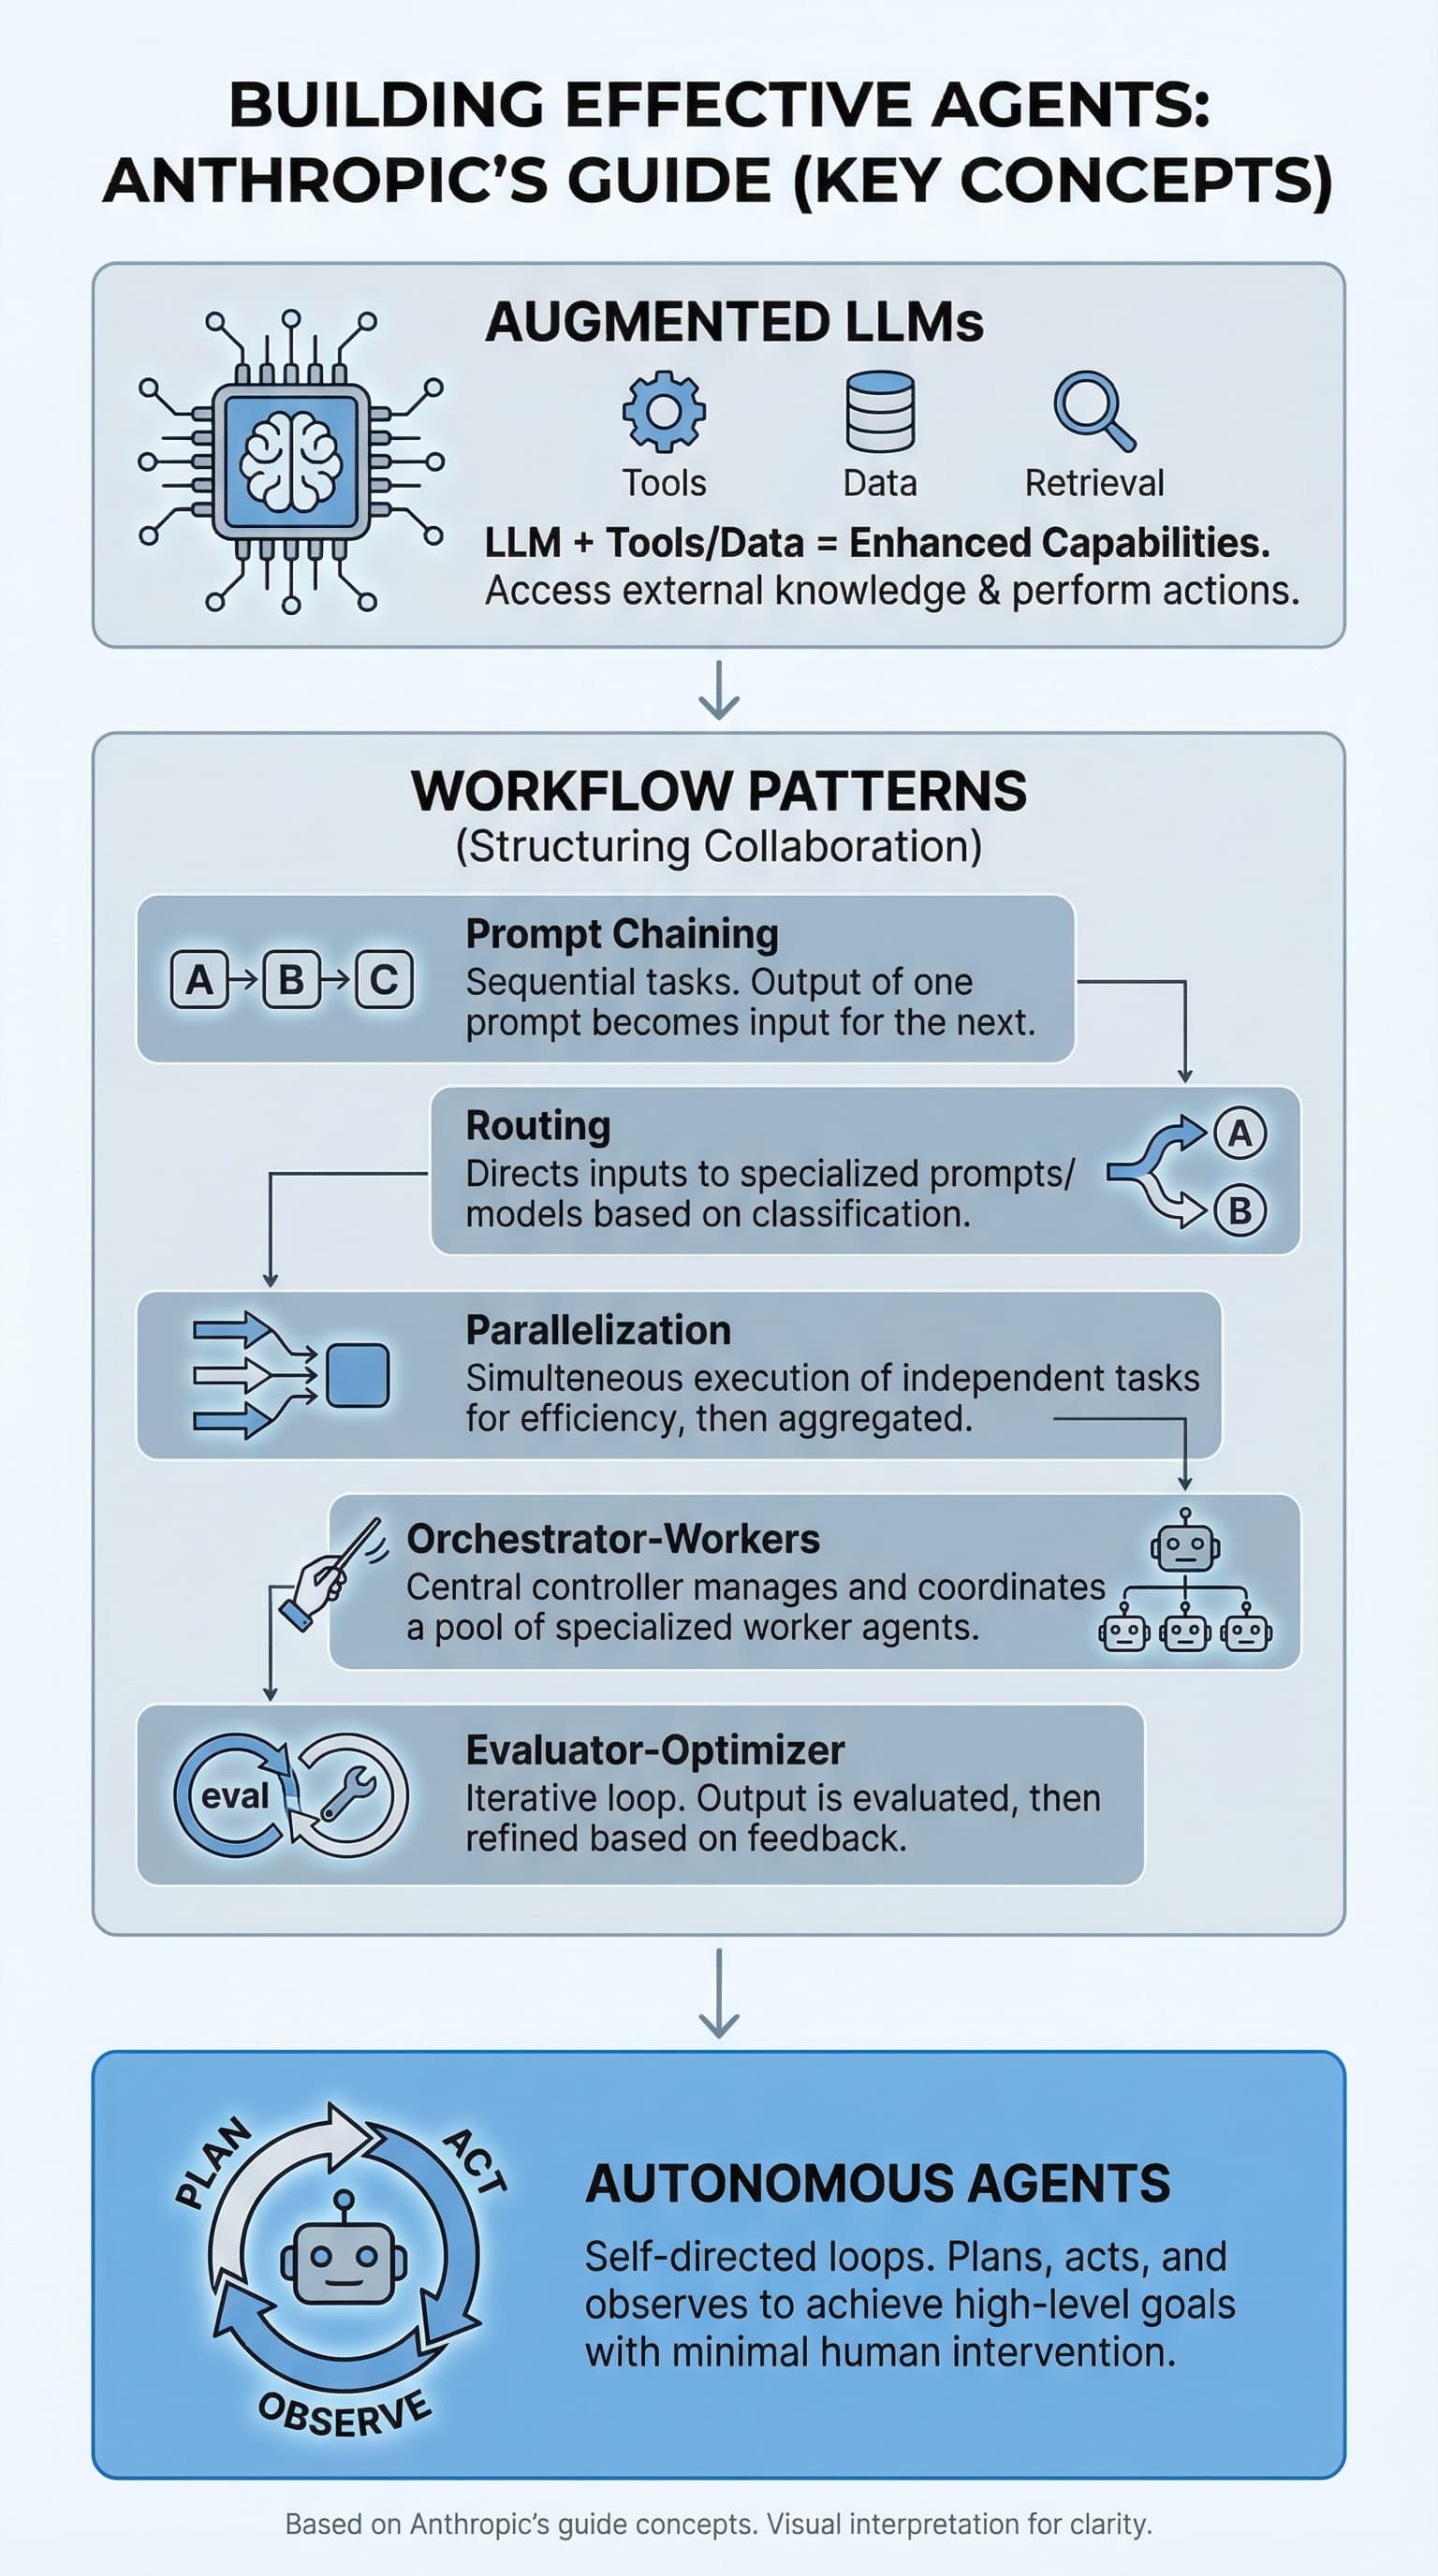
Clean and minimal. The layout is clear with a nice vertical flow. Icons are simple and the text is readable. It covers all the key concepts but keeps things sparse. This is similar to what we got in the original tutorial.
Nano Banana 2 (New Model)
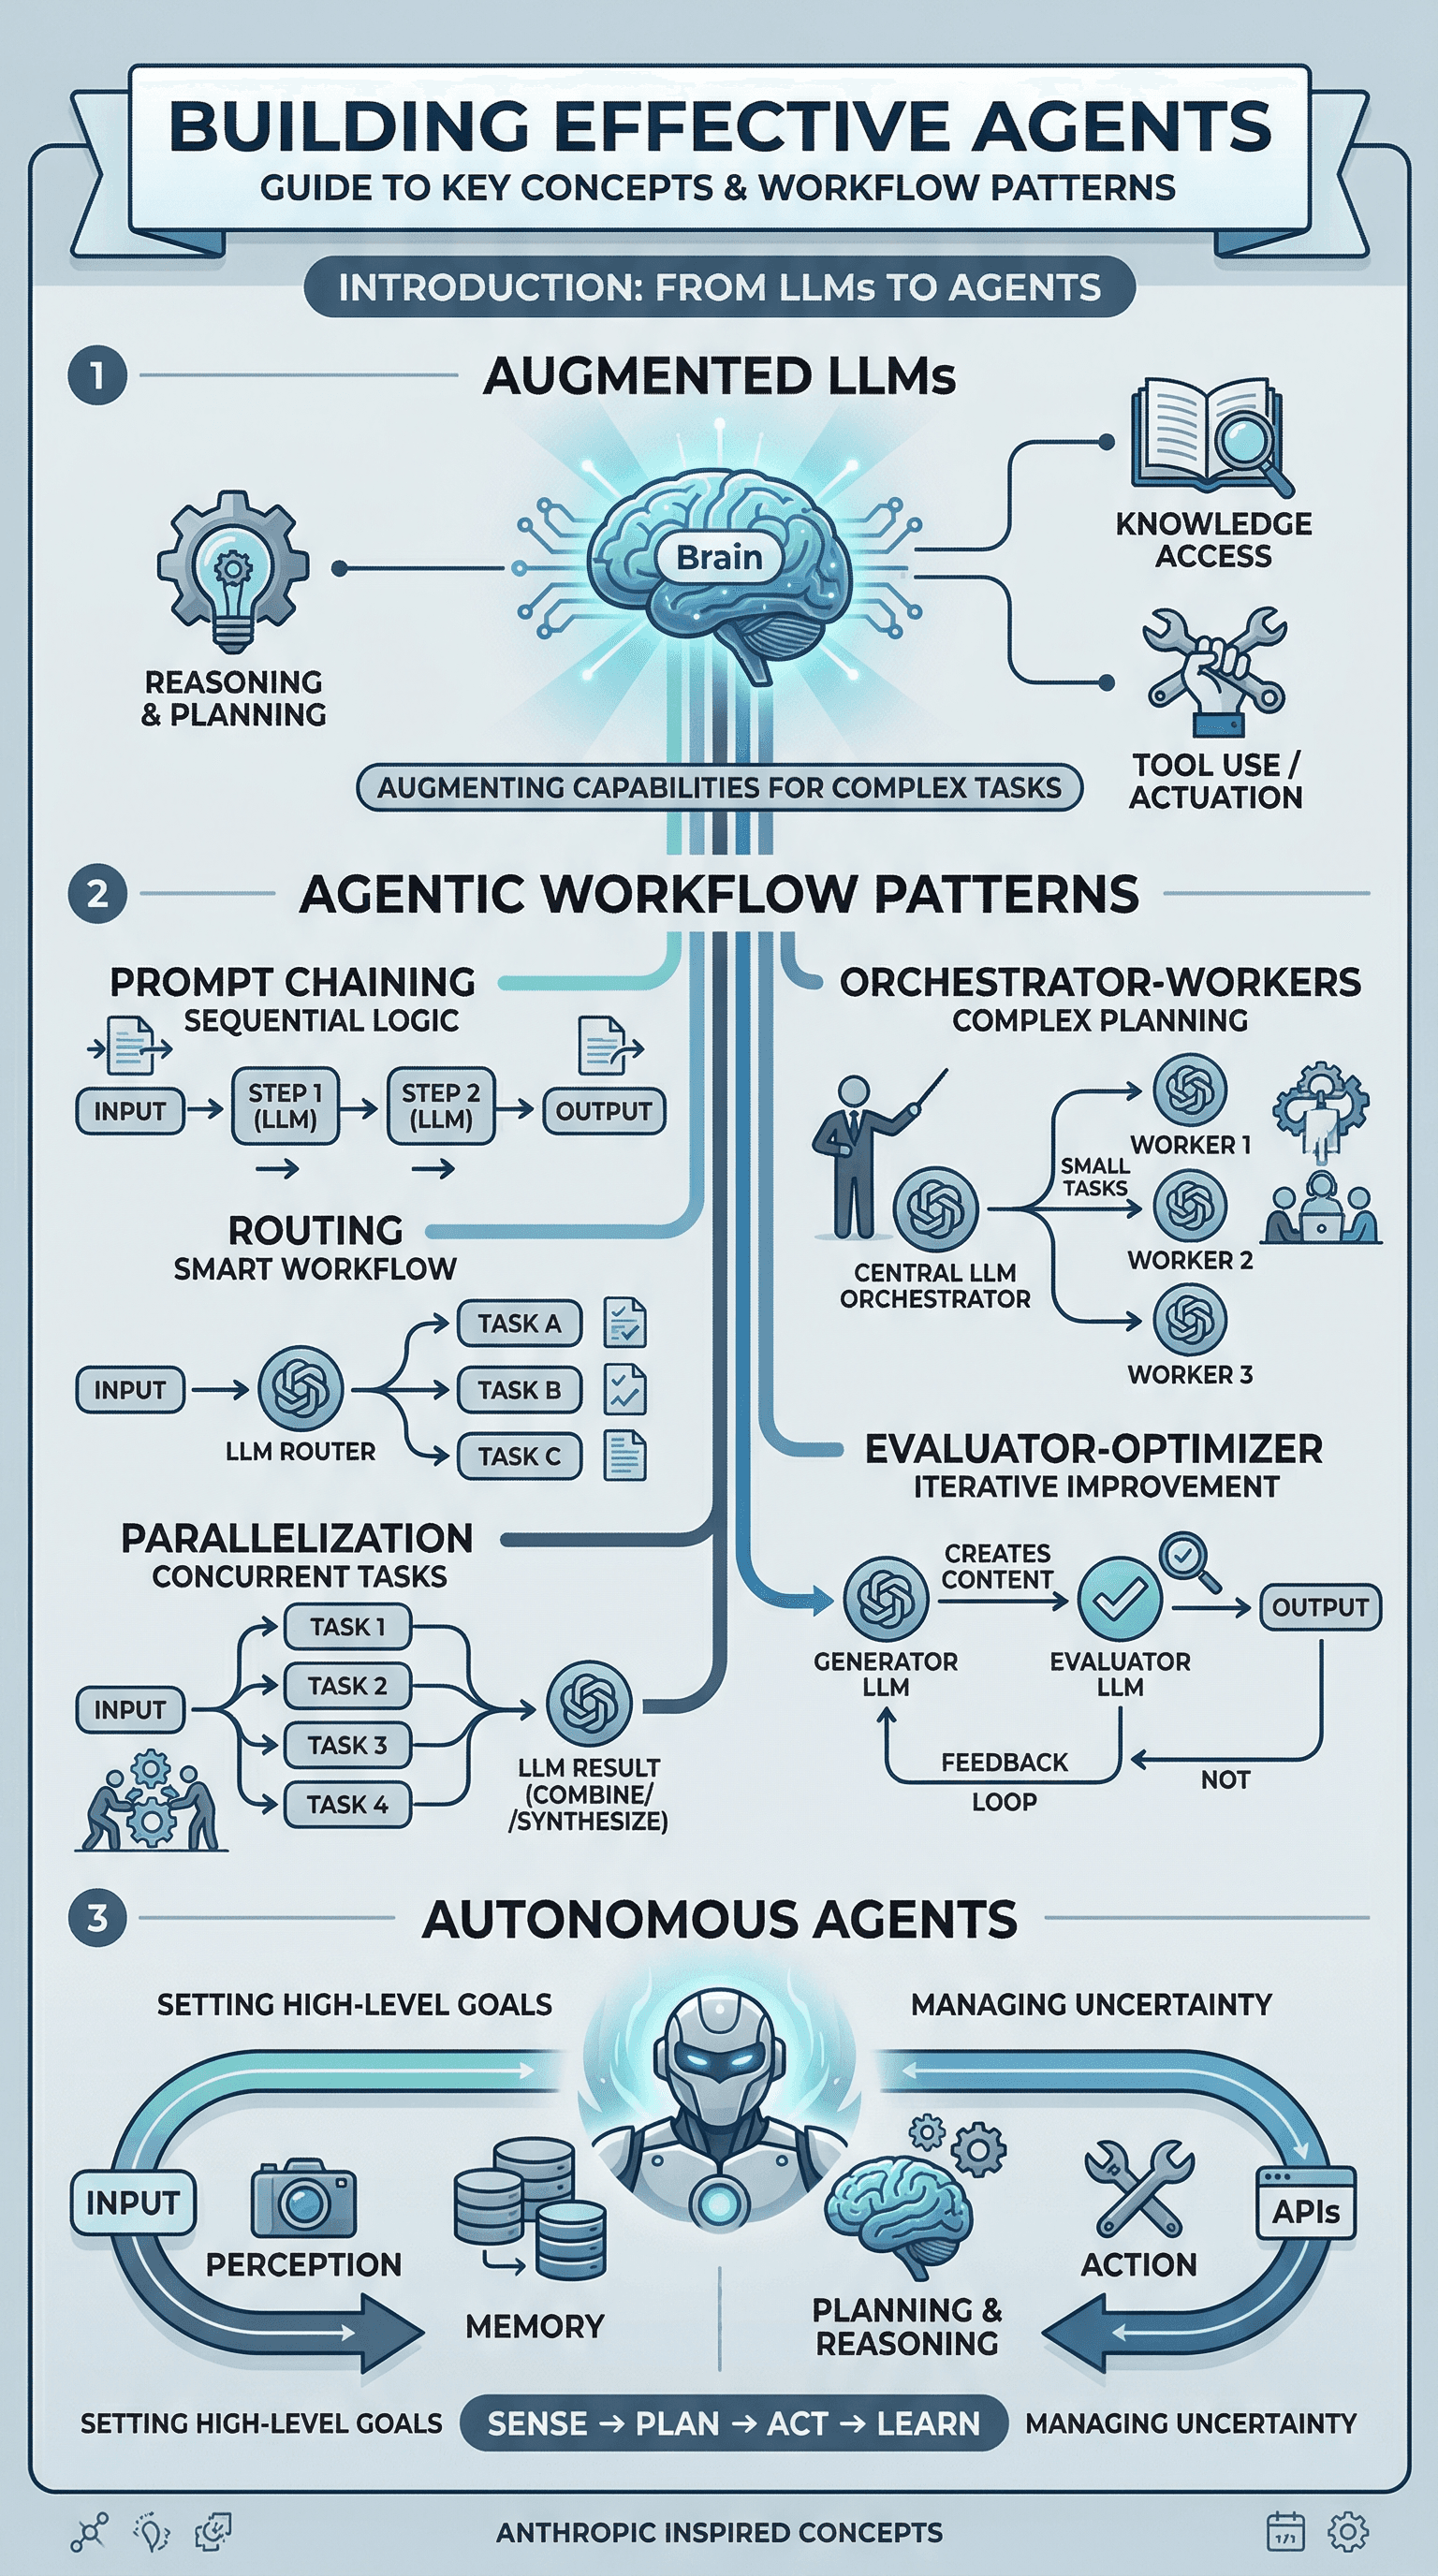
Noticeably richer. The first thing that stands out is the level of detail. NB2 packed in more visual elements, better iconography, and a more structured layout with numbered sections and clear flow diagrams for each workflow pattern. The Autonomous Agents section at the bottom includes a full perception-planning-action loop diagram that the Pro version didn't attempt.
Key difference: NB2 produced an infographic that feels more like something a designer would create. The Pro version felt more like a quick summary. Both had accurate text rendering, but NB2 showed more ambition in the visual design.
Experiment 2: Logo Design
We tested the same logo prompt from our "What Else Can You Generate?" section.
Prompt:
Design a minimalist logo for a project called Nexus AI. Use blue and
white color scheme. Clean, bold, sans-serif font. Place the logo in
a circle with a subtle neural network pattern.
Nano Banana Pro
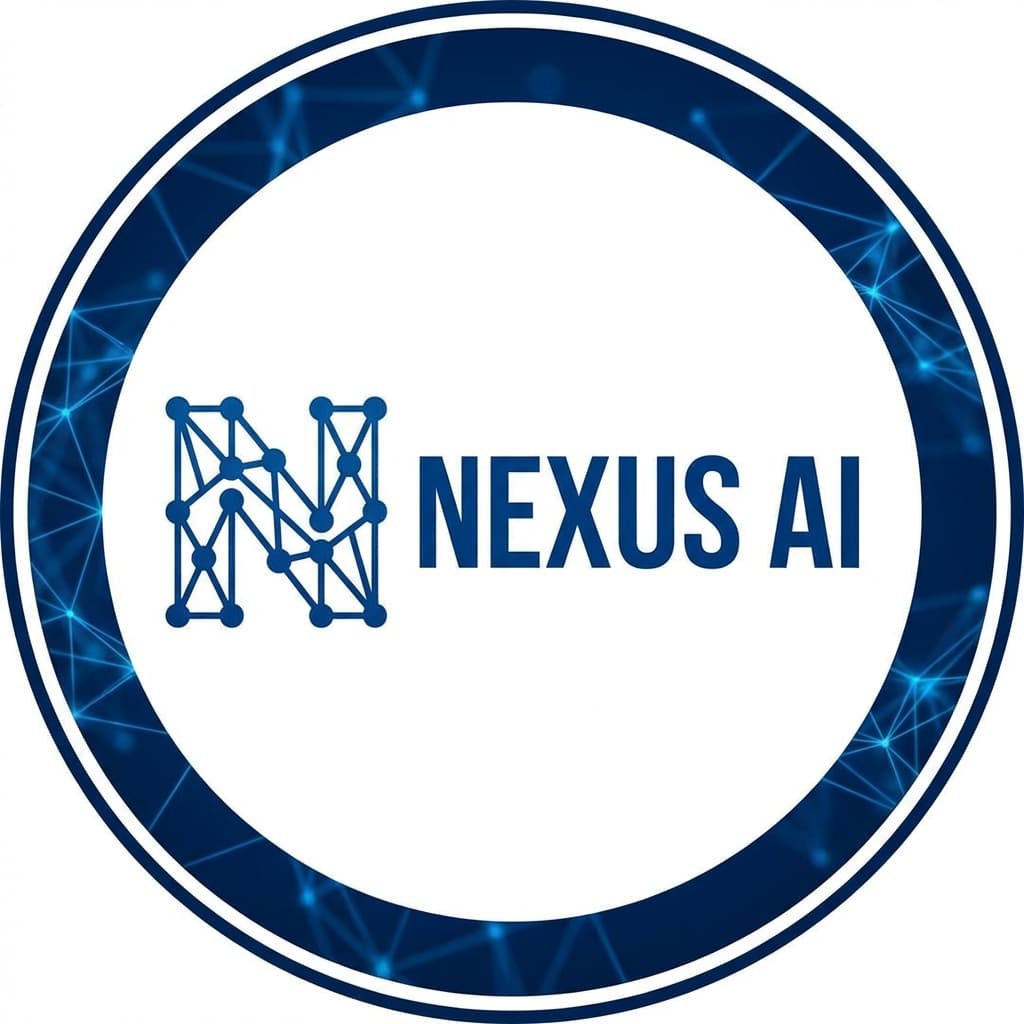
A bold, stylized design with a neural network "N" letterform. The circle border has a glowing network pattern. It's creative but feels more like a digital art piece than a usable logo. The proportions are large and the design is complex.
Nano Banana 2
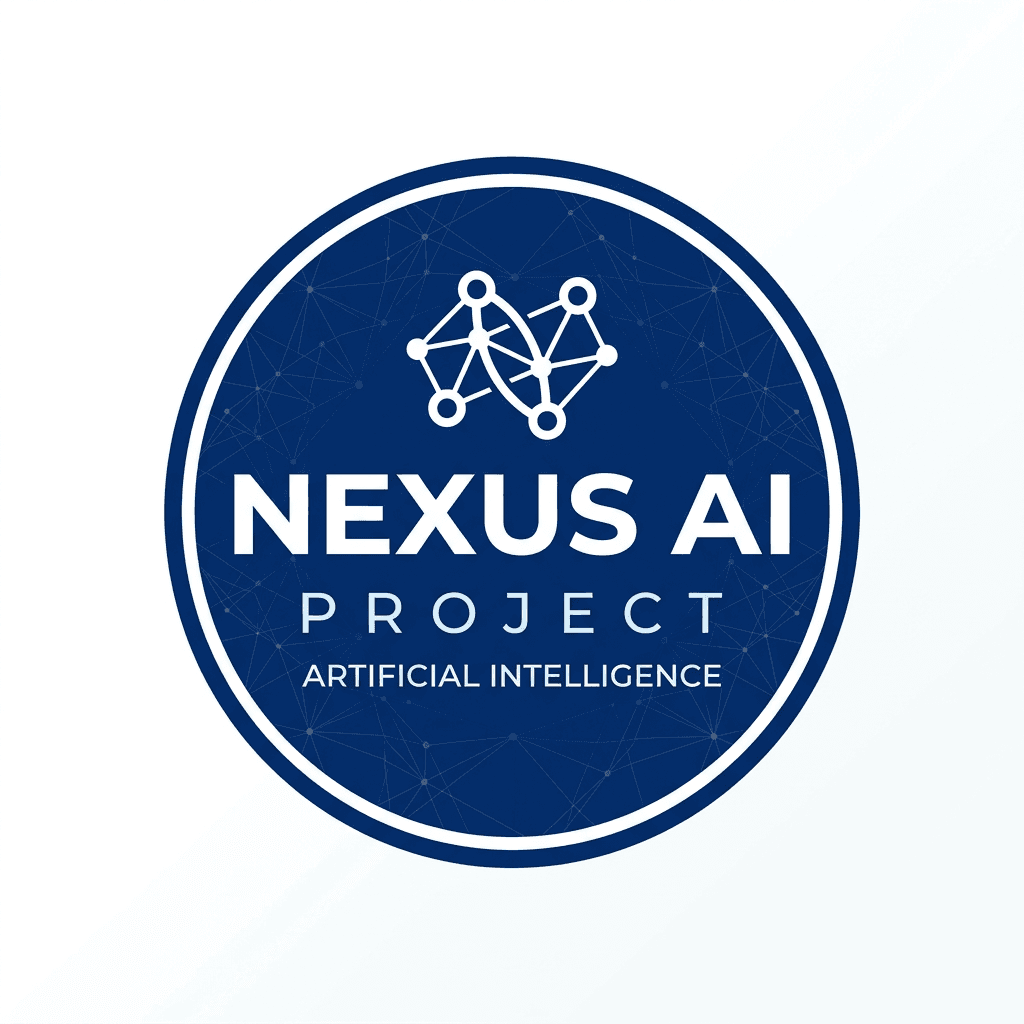
More practical. This looks like a logo you could actually use in a product. Compact badge design, clean typography with "NEXUS AI" and "PROJECT" text clearly rendered, and a small network icon at the top. The circular layout is tighter and more balanced. You could drop this into a README or a website header without much editing.
Key difference: NB2 produced something closer to a production-ready asset. The Pro version was more artistic but less immediately usable.
Experiment 3: Blog Cover Image
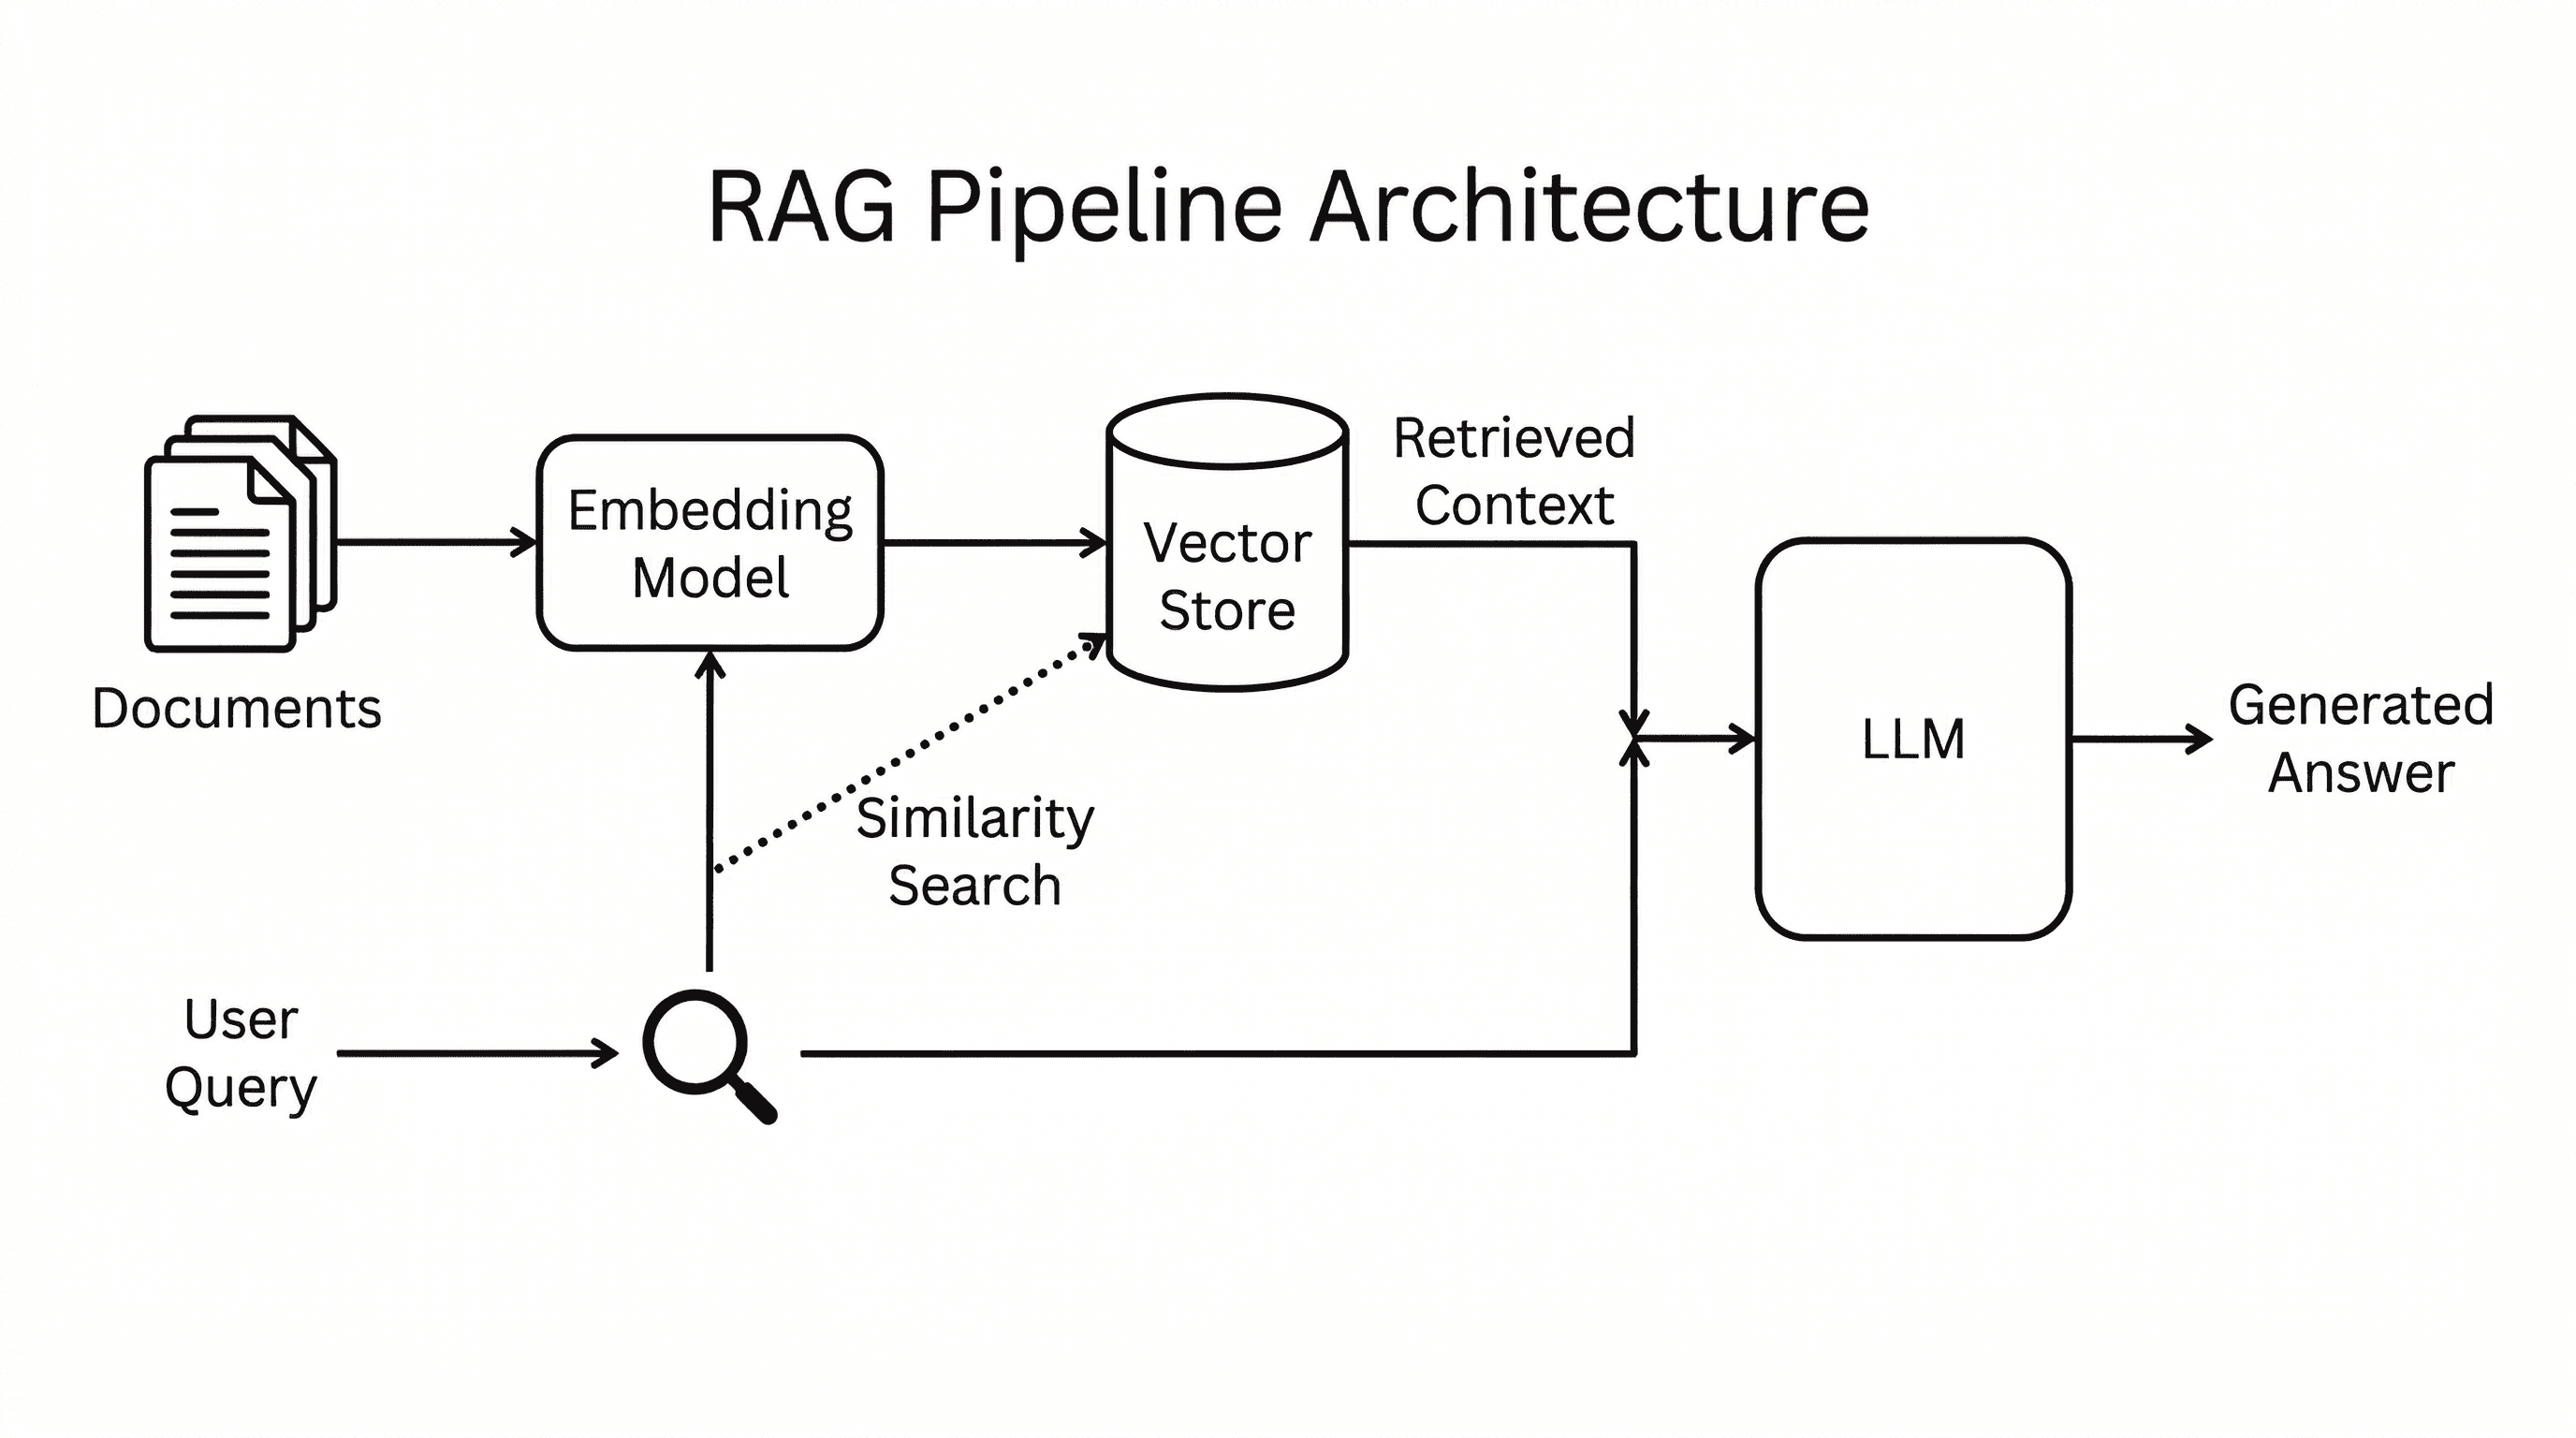
Technical architecture diagrams are one of the most common use cases in our agentic workflow. We tested a RAG pipeline architecture diagram with a prompt designed to produce a clean, whitepaper-style figure rather than a flashy marketing graphic.
Prompt:
A clean technical architecture diagram for a blog post about RAG
pipelines. White background. Show the pipeline as a left-to-right
flow: on the left, a document corpus icon labeled 'Documents' feeds
into a box labeled 'Embedding Model', which connects to a cylinder
labeled 'Vector Store'. A separate path shows 'User Query' going
into the same Embedding Model, then a dotted line to 'Similarity
Search' against the Vector Store. The retrieved context and query
merge into a box labeled 'LLM' which outputs 'Generated Answer'
on the right. Use thin black lines, rounded rectangles, simple
monochrome icons, and a sans-serif font. No gradients, no glow,
no 3D effects. Style like a whitepaper technical figure. Title at
top: 'RAG Pipeline Architecture'.
Nano Banana Pro

This is genuinely impressive. The diagram shows the full pipeline with proper iconography: a document stack, the Embedding Model box with a brain-gear icon, a database cylinder for Vector Store, magnifying glasses for Similarity Search, a robot icon for the LLM, and a lightbulb for the Generated Answer. The dotted-line paths between the User Query and Vector Store are correct. Every label is readable and properly placed. The two-path flow (documents and query) merging at the LLM is architecturally accurate.
Nano Banana 2
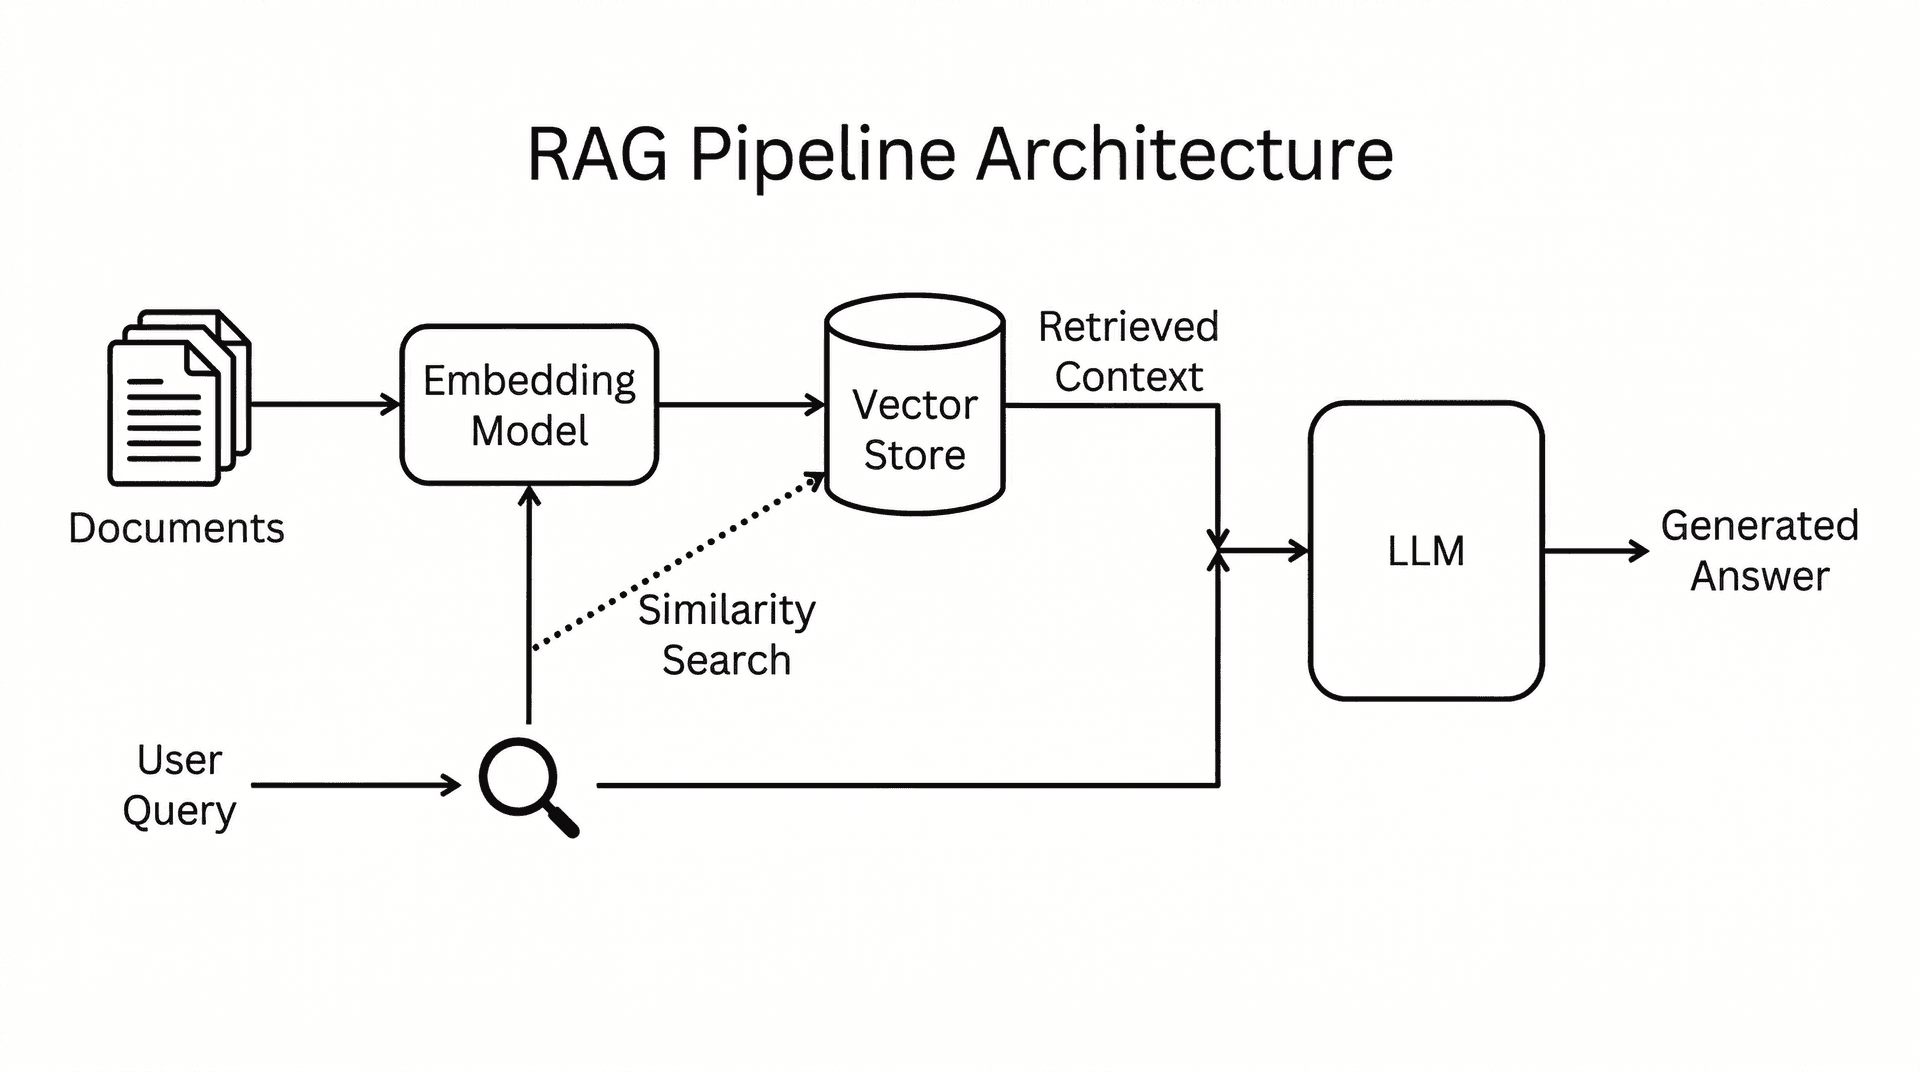
Cleaner and more minimal. NB2 went with a sparser layout: thin black lines, simple document and magnifying glass icons, and a more compact arrangement. The "Retrieved Context" label on the dotted path from the Vector Store is a nice touch. The overall feel is closer to something you'd see in an academic paper or a technical whitepaper. Less decorative, more functional.
Key difference: Both models produced architecturally correct diagrams with every component and flow path in the right place. Pro went with richer iconography and larger, more detailed components. NB2 went minimal and academic. Which you prefer depends on the context: Pro's version works better as a standalone blog visual, NB2's feels more at home in a technical document.
Experiment 4: Object Fidelity (5 Distinct Objects)
Google claims NB2 can maintain fidelity of up to 14 objects in a single image. We tested with 5 highly specific objects, each with distinct material properties and fine details. The prompt was intentionally anti-slop: no glow effects, no neon, no gradients. Just a flat-lay photo with specific, grounded objects.
Prompt:
A flat-lay photograph shot from directly above on a weathered oak desk.
Five distinct items arranged in a grid: (1) a worn leather-bound journal
with a brass clasp, (2) a half-empty ceramic mug of black coffee with
a visible ring stain, (3) a pair of round tortoiseshell reading glasses
with one slightly bent arm, (4) a fountain pen with a dark blue ink stain
on its nib, and (5) a crumpled sticky note with the handwritten text
'Call Sarah - 3pm'. Natural window light from the upper left, slight
dust particles visible. No filters, no glow effects. Documentary
photography style.
Nano Banana Pro

All five objects are present and distinct. The leather journal has a brass clasp, the coffee mug is ceramic, the glasses are tortoiseshell, and the sticky note reads "Call Sarah - 3pm" correctly. The arrangement is clean and symmetrical. It looks good but has that slightly too-perfect quality, like a stock photo.
Nano Banana 2

Same five objects, but notice the difference in texture. The leather journal looks genuinely worn with visible patina and age marks. The wood grain on the desk has more character. The ink stain on the fountain pen nib is visible as a small splatter. The sticky note has a more realistic crumple. Each object feels like it has a history.
Key difference: NB2 handled the material properties better. The worn leather, the ceramic glaze, the ink stain - these small details are what separate a generated image from one that could pass as a real photograph. Both models got the object count and positioning right, but NB2's textures felt more grounded.
Experiment 5: Multi-Scale Text Rendering
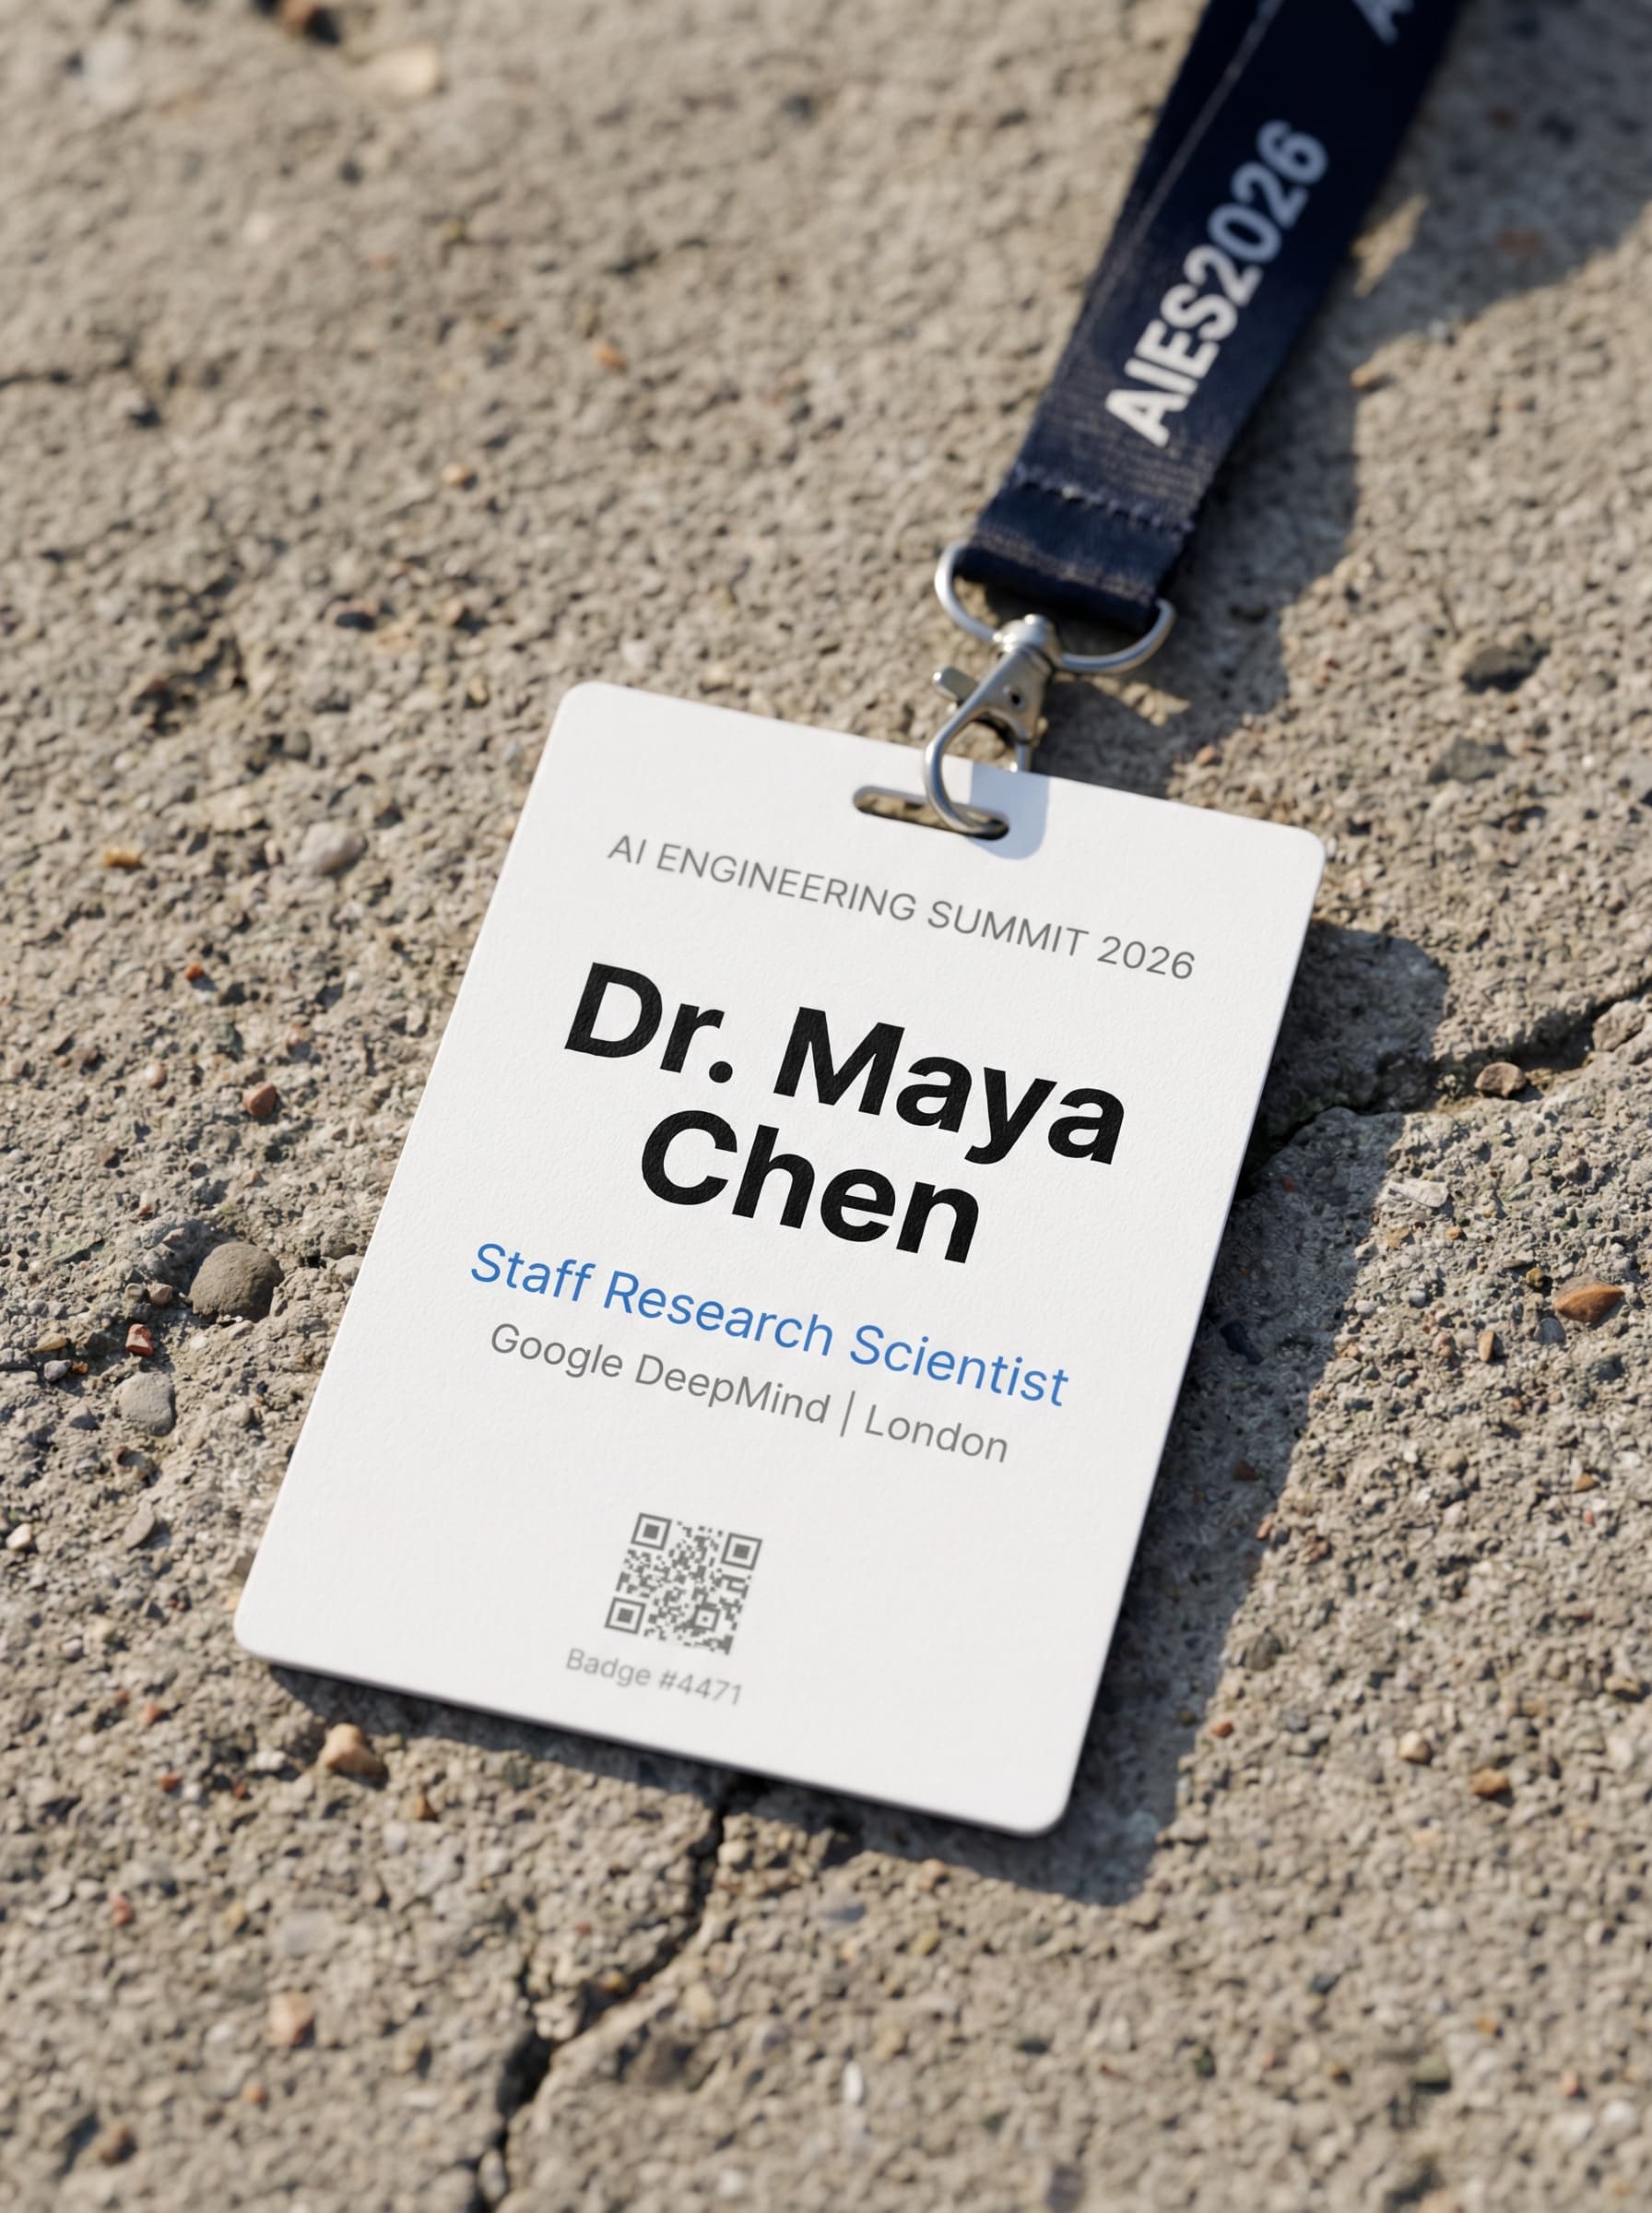
This was the stress test. Google specifically highlighted improved text rendering in NB2. We designed a conference badge with six different text sizes and styles, from large bold names to tiny badge numbers. This is the kind of task where older models typically break down on the smaller text.
Prompt:
A realistic photograph of a conference name badge lying on a concrete
surface. The badge is white with a lanyard. It reads: Top line in small
gray caps: 'AI ENGINEERING SUMMIT 2026'. Main name in large bold black:
'Dr. Maya Chen'. Below in medium blue: 'Staff Research Scientist'.
Below that in small gray: 'Google DeepMind | London'. At the bottom a
small QR code placeholder and tiny text: 'Badge #4471'. The lanyard is
dark navy with white repeated text 'AIES2026'. Shot with shallow depth
of field, slight shadow on the right side. No glow, no neon, no gradients.
Nano Banana Pro
Nano Banana 2
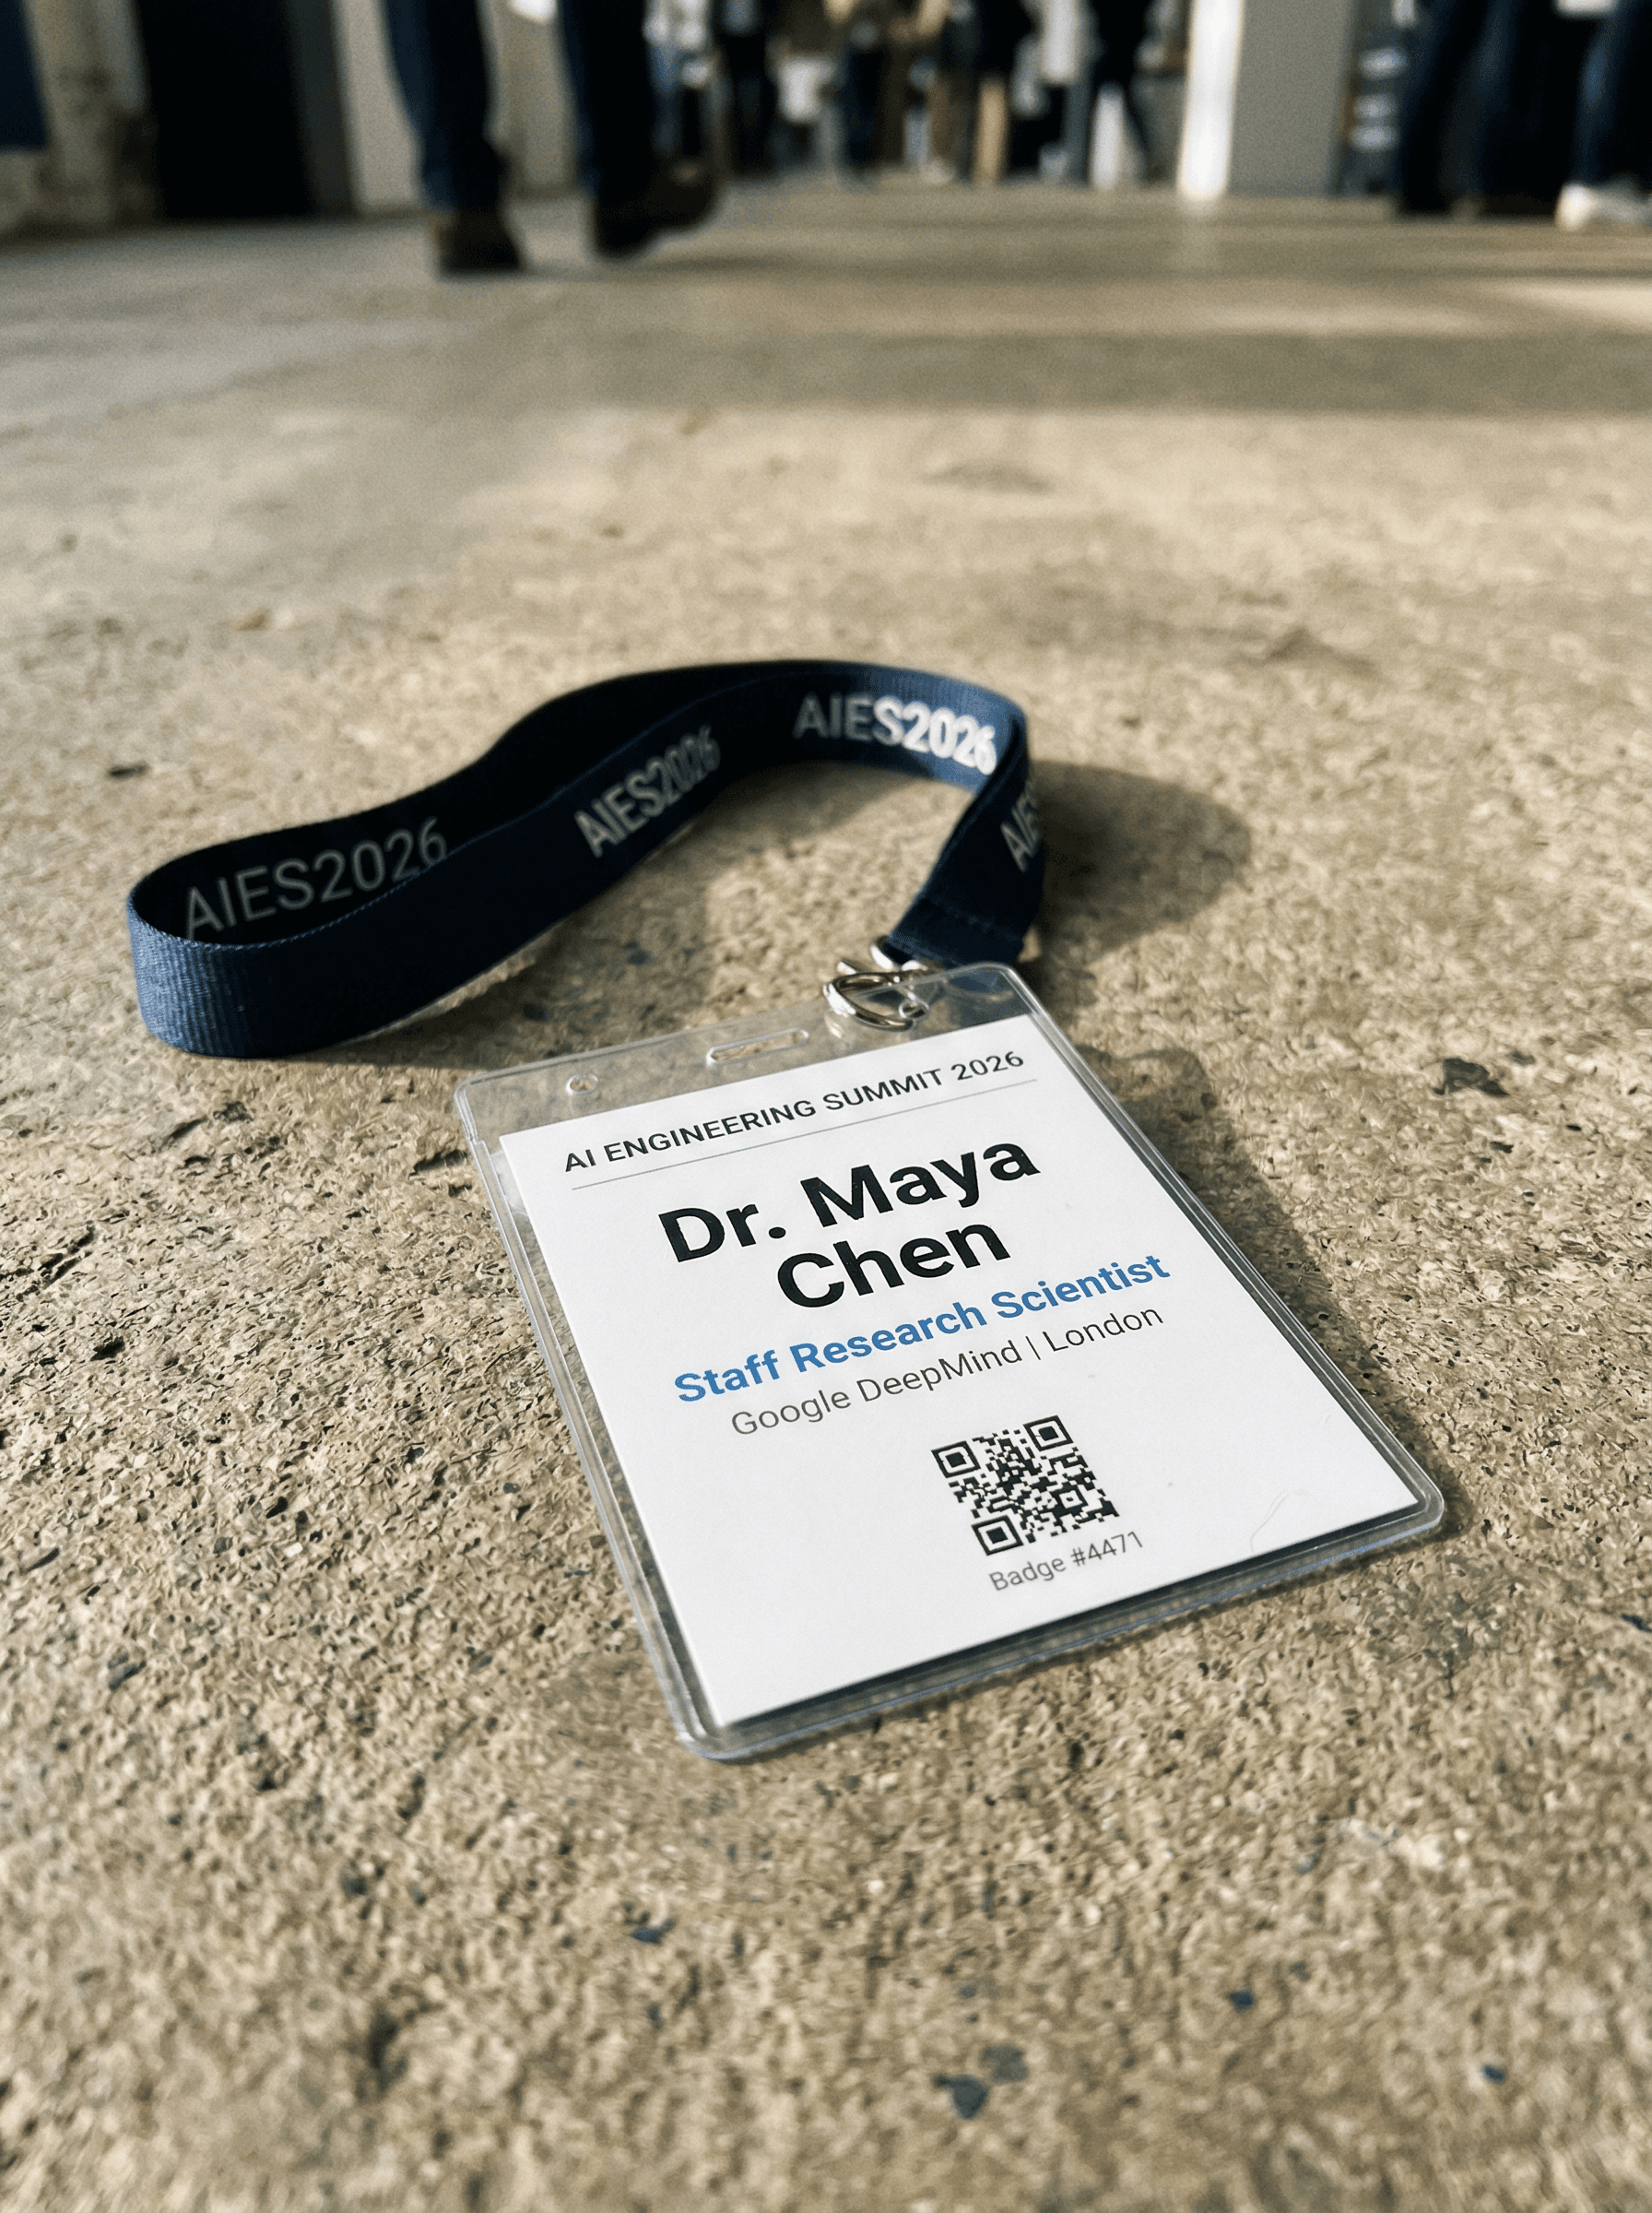
Both models rendered every single text element correctly. "AI ENGINEERING SUMMIT 2026" in small caps, "Dr. Maya Chen" in bold, "Staff Research Scientist" in blue, "Google DeepMind | London" in gray, "Badge #4471" in tiny text, and "AIES2026" repeated on the lanyard. Even the QR code appeared on both.
This is genuinely impressive from both models. The NB2 version added environmental context (blurred conference attendees in the background, a perspective angle) while the Pro version kept a cleaner, more centered composition. On pure text accuracy, this is a tie.
Key takeaway: For multi-scale text, both models have reached a level where you can reliably generate marketing mockups, badge designs, and signage with confidence. This was not the case even six months ago.
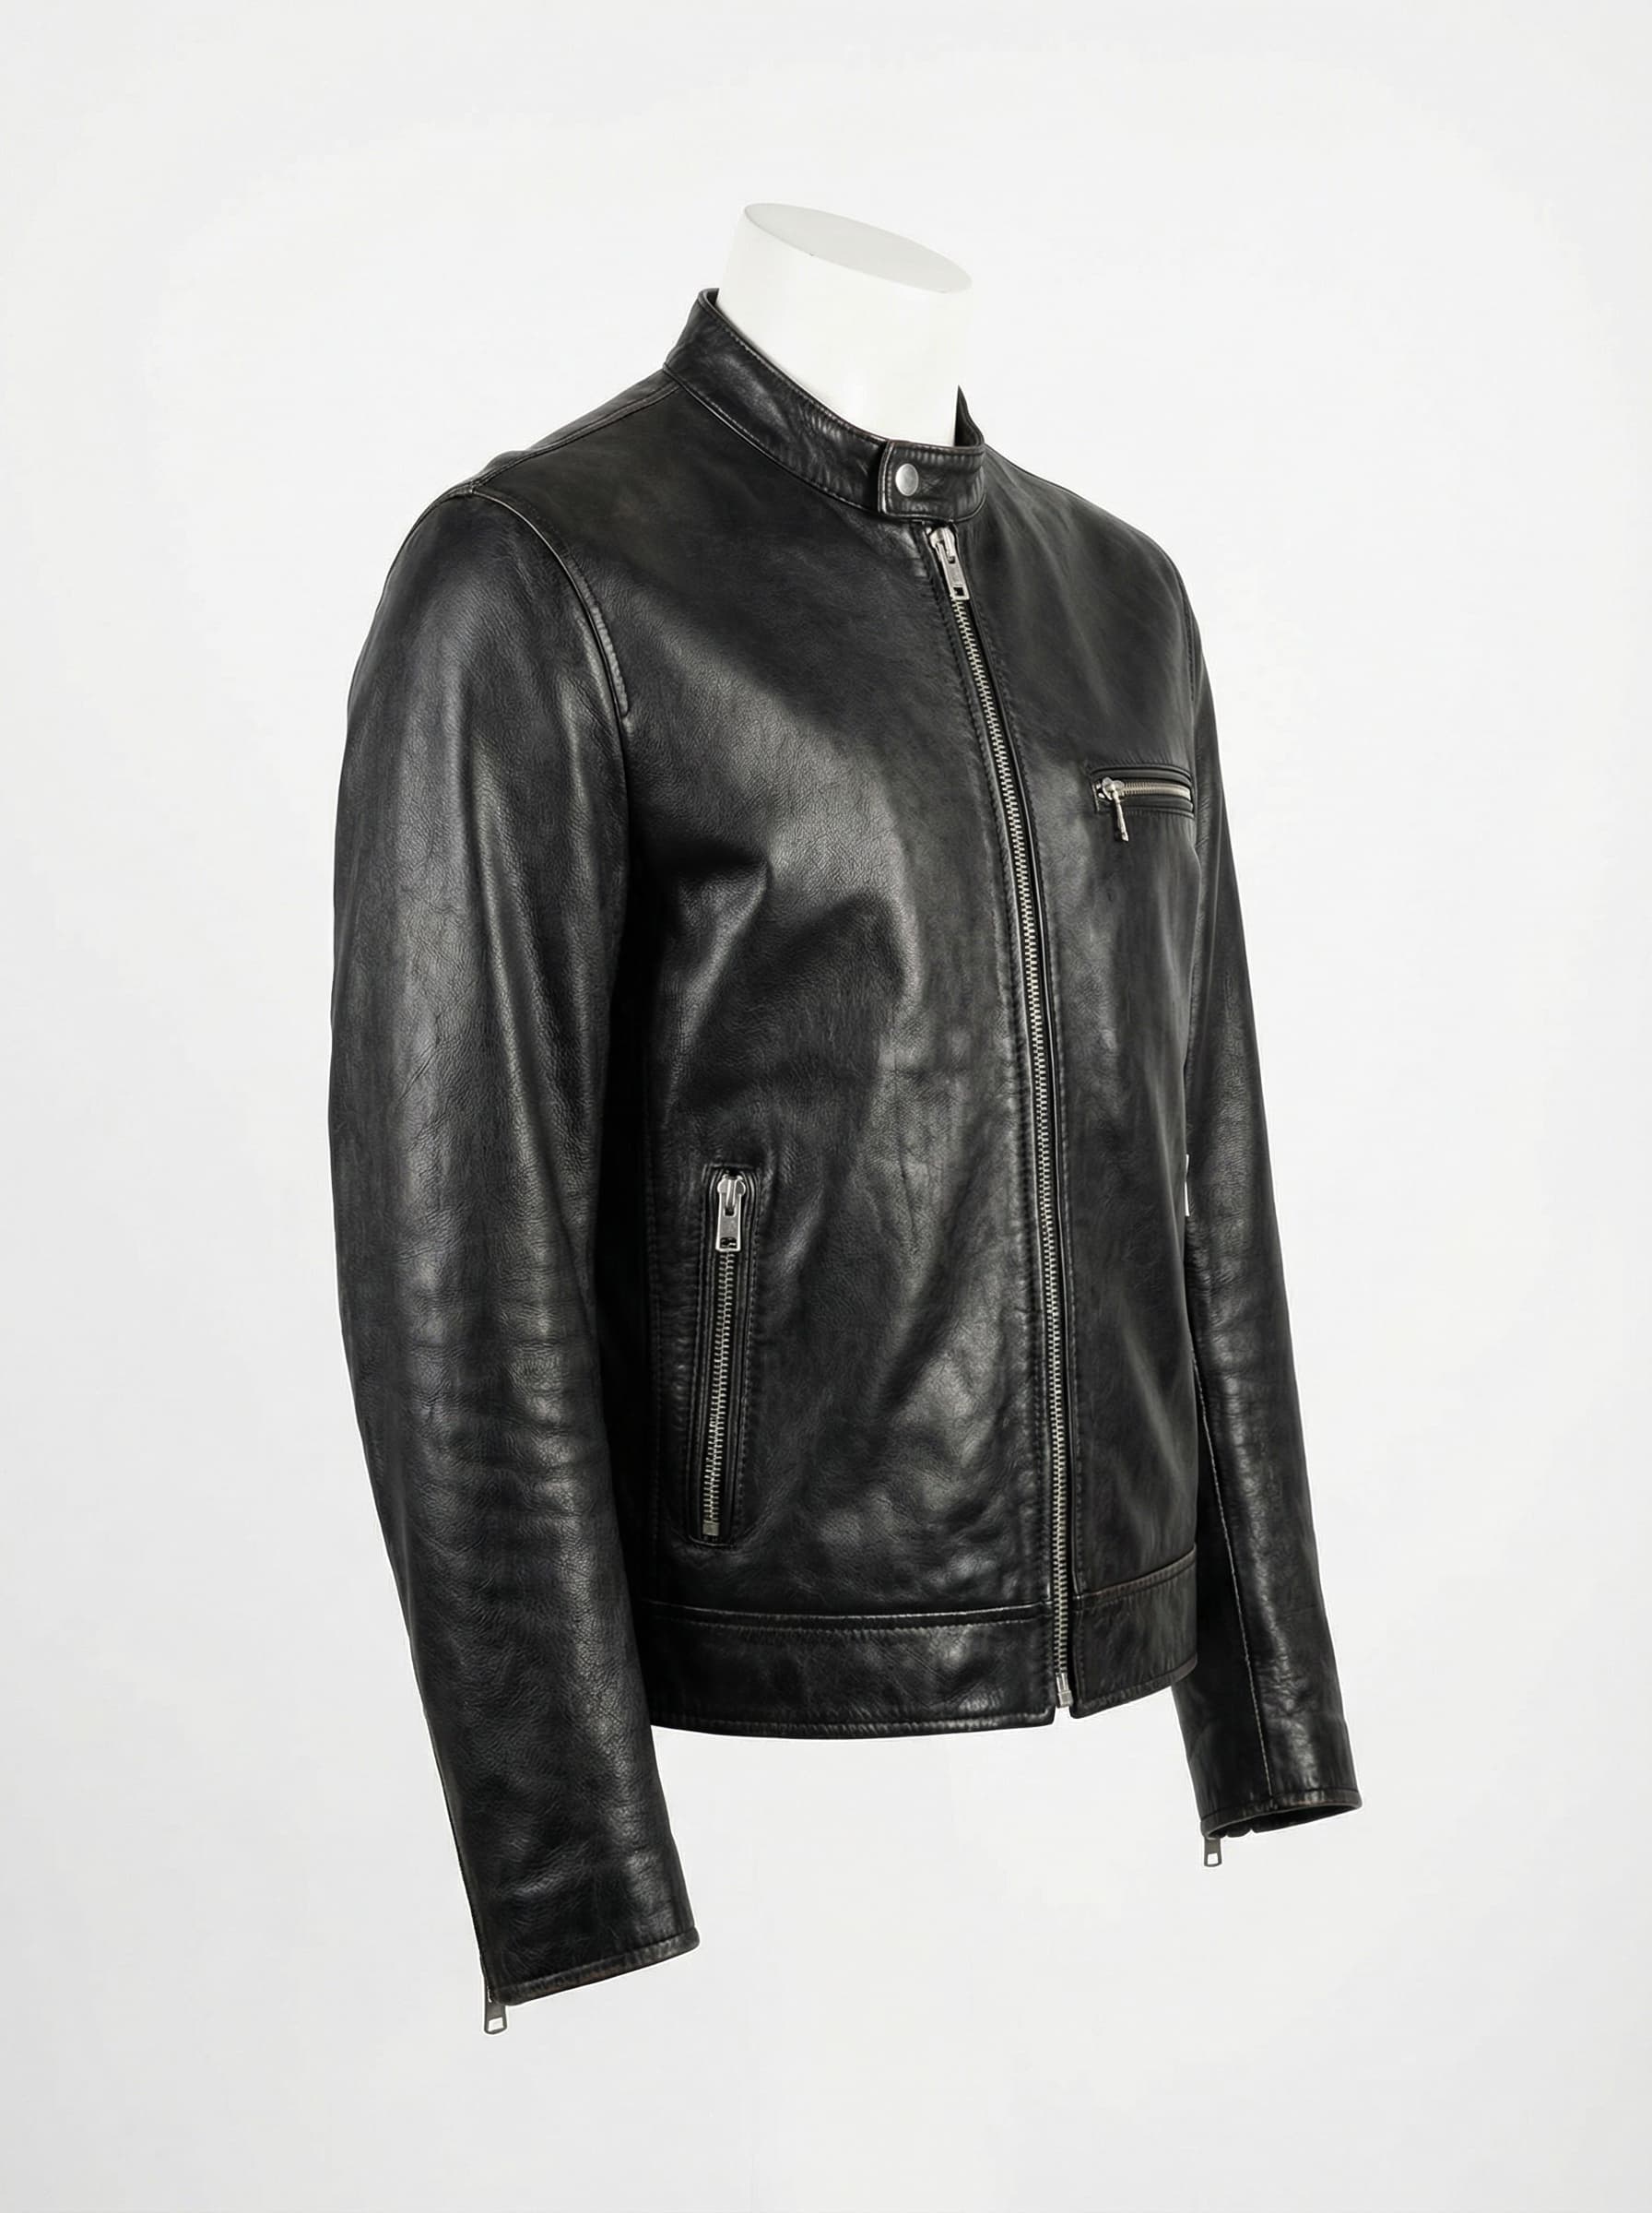
Experiment 6: World Knowledge with Search Grounding
One of NB2's headline features is integration with Google Search for real-time world knowledge. This means the model can ground its image generation in actual, current information from the web. We ran two tests to see how much this matters in practice.
Test A: Recognizable Real-World Subject
We asked both models to render Jensen Huang's iconic leather jacket as a product shot. This requires knowing what a specific, real-world object looks like.
Prompt:
A photorealistic image of the Jensen Huang leather jacket as a product
shot on a white background. The iconic black leather jacket he wears
at every NVIDIA keynote. Studio lighting, three-quarter angle, clean
product photography. No person, just the jacket on a mannequin torso.
NB2 was given search grounding (google_search tool enabled). Pro was not (it doesn't support this feature).
Nano Banana Pro
A clean, generic black leather moto jacket on a mannequin. Good product photography with natural leather grain and proper zipper details. But it's a generic leather jacket, not specifically the Jensen Huang jacket. No NVIDIA-specific details.
Nano Banana 2 (with Search Grounding)

Notably more specific. The jacket has a different silhouette with a mandarin collar, multiple diagonal zip pockets, and visible NVIDIA interior branding on the inner label. The leather texture has a subtle perforated pattern. These details suggest the model actually referenced images of the real jacket rather than generating a generic one.
Key takeaway: Search grounding is a genuine differentiator for NB2. For any image that needs to reference real-world subjects or specific recognizable items, NB2 with search grounding produces meaningfully more accurate results. Pro generates beautiful images, but without access to real-time information, it falls back on generic representations rather than rendering the specific subject you asked for.
Nano Banana 2 vs Nano Banana Pro: What We Learned
After running six side-by-side comparisons, here's what we found:
Visual richness and textures went up. NB2 consistently produced more detailed outputs with better material properties. The worn leather, the ink stains, the wood grain - these small texture details are noticeably improved. Infographics had more icons and flow diagrams. Logos were more compact and balanced.
Text rendering is strong on both models now. The conference badge test was a near-perfect tie. Both models handled six different text sizes and styles without errors. This is a meaningful milestone for image generation. For the blog cover, NB2 had an edge with cleaner small-scale text where Pro produced some artifacts.
Results feel more production-ready. The NB2 outputs needed less iteration to be usable. The logo could go straight into a project. The blog cover could be used as-is. The flat-lay photo could pass for a real photograph. With Pro, you'd typically want at least one round of refinement through the annotate-and-refine loop.
Search grounding is a game changer. The jacket test showed that Nano Banana 2's ability to pull real-time information from Google Search makes a tangible difference. It rendered NVIDIA-specific details that Pro couldn't access. For product renders, editorial visuals, or anything referencing real-world subjects, this feature alone justifies choosing Nano Banana 2.
Pricing is significantly better. At roughly half the cost per image and 75% cheaper text tokens, running the same agentic workflows costs less. This matters when you're iterating through the generate-annotate-refine loop multiple times.
The right model depends on the task. For blog covers, social media graphics, logos, product mockups, editorial visuals, and most marketing assets, Nano Banana 2 is the clear default. It's faster, cheaper, and produces more polished results. Nano Banana Pro still has value for tasks that require its deeper reasoning on complex compositional prompts, but Nano Banana 2 covers the vast majority of practical use cases.
Using Nano Banana 2 with the Image Generator Plugin
We'll be updating the image-generator plugin to support Nano Banana 2 as the default model. In the meantime, you can use it directly through the API by swapping the model ID in your calls:
# Old model
gemini-3-pro-image-preview

# New model
gemini-3.1-flash-image-preview
Everything else in the agentic image generation workflow stays the same. The generate-annotate-refine loop, the Playground plugin integration, and all the prompting tips still apply. You're just getting better results from each generation cycle now.
Try It Out
If you're already using the image-generator plugin, swap the model and re-run your favorite prompts. You'll likely notice the improvement immediately, especially on anything involving text or detailed layouts.
If you're new to this workflow, start with our Agentic Image Generation tutorial to set everything up, then come back here to upgrade to NB2.
Want to learn more about building with AI? Check out our courses or join the community to discuss with other builders.